|
How do I track upsells and downsells in Kartra?
To get started with tracking your upsells and downsells inside of Karta, follow the steps shown below:
Step 1 - Add Your Click Tracking Code to your sales page
You can get your click tracking code by going to the Tools menu in Campaigns, and clicking “Website Code”.
From there, you will want to click on “Custom Website Code” to pull up the dialogue below to copy your code:
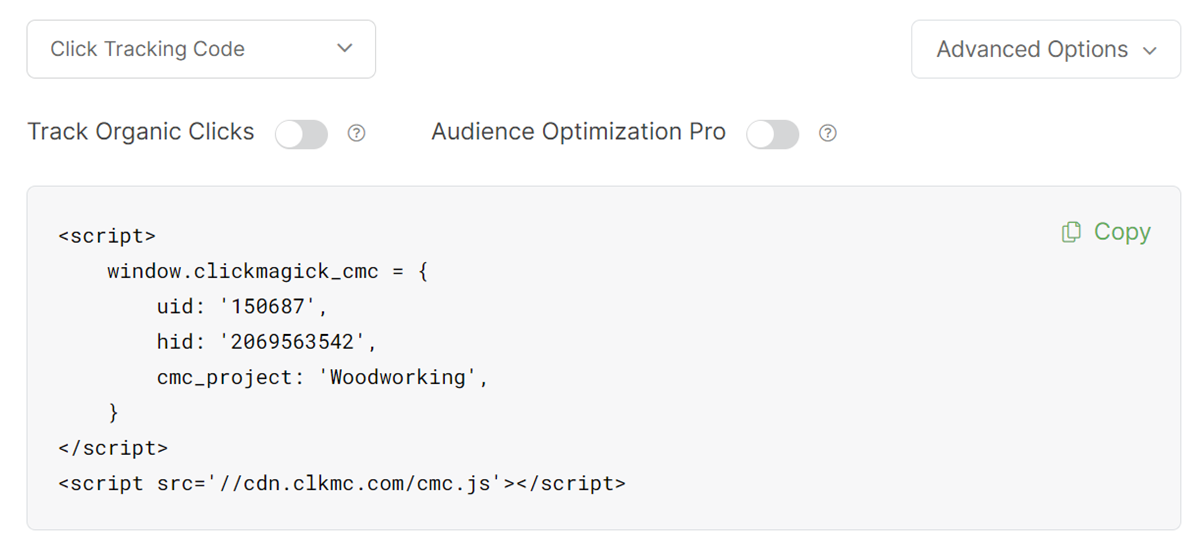
You can also get your Click Tracking Code below:
<script>

    window.clickmagick_cmc = {

        uid: '[USERID]',

        hid: '[HID]',

        cmc_project: 'NameOfYourProject',

    }

</script>

<script src='//cdn.clkmc.com/cmc.js'></script>
Note: If you decide to copy the code above, Be sure to change
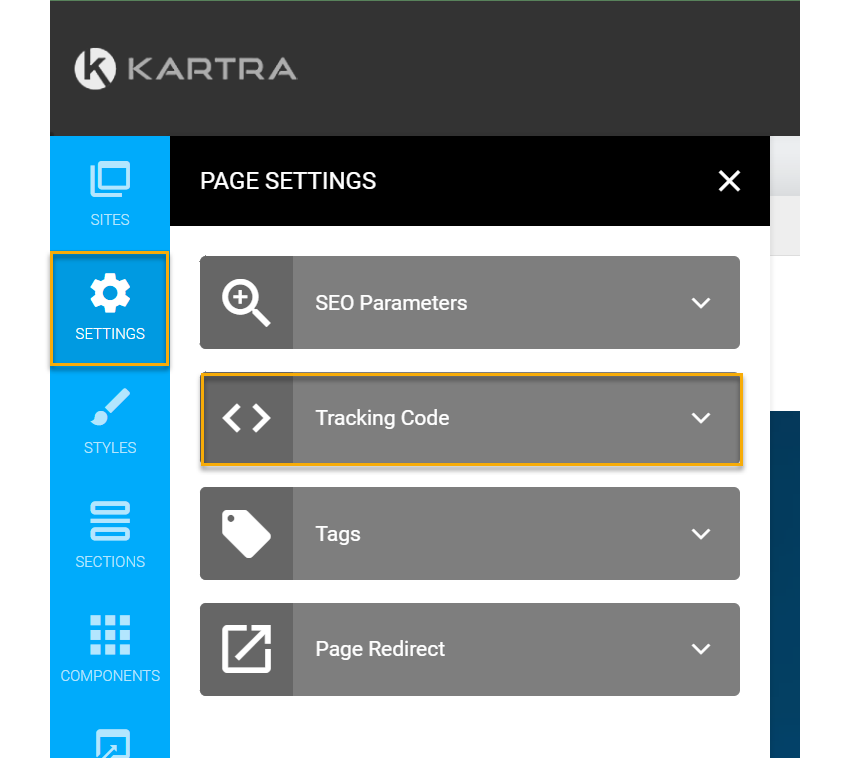
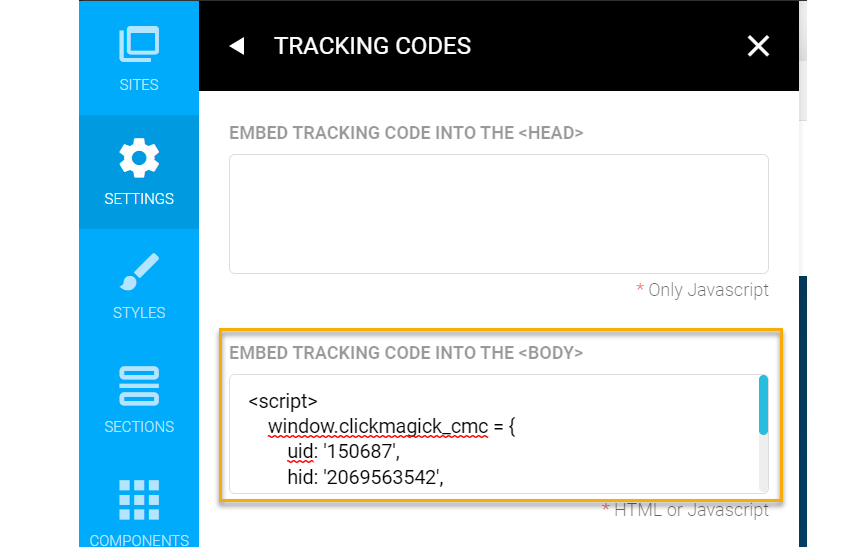
NameOfYourProject after cmc_project as you want to make sure it tracks properlyFrom there, you’ll head over to Kartra, go to the landing page you want to put the code on, and click Settings, and then click Tracking Code.
Put your click tracking code into the box for the “Body” section of the page.
Step 2 - Add Your Sales Conversion Code To Your First Upsell Page
You can get your sales conversion code below:
<script>

    window.clickmagick_cmc = {

        uid: '[USERID]',

        hid: '[HID]',

        cmc_goal: 's',

        cmc_ref: 'productName',

        cmc_amt: 'price',

        log_upsell: 'buttonID:price:ref',

    }

</script>

<script src='//cdn.clkmc.com/cmc.js'></script>
Just be sure to replace the
cmc_ref and cmc_amt to represent the product that is purchased from your sales page.Step 3 - Log The Yes Button Click On Your First Upsell Page
You do this by modifying the line in the code above.
You will editing this line of code:
log_upsell: 'buttonID:price:ref',First, you need to get the Button ID from your upsell page.
To get the Button ID of the Yes button on your Upsell Page, visit your page in a new tab or window.
Right click on the button and click “Inspect”.
You'll be taken to the code for your button instantly which will look something like this:

What you’re looking for is that button id, which in this case is “
accordion-SnYfnlBRNG” Now you'd just update the
price and ref value for the upsell being sold.So for example, if your upsell is called Six Pack Abs and it sells for $97 you'd modify the line as shown below:
log_upsell: 'accordion-SnYfnlBRNG:97:sixPackabs',The complete code on the first upsell page that sold a $7 product on the front end would look like this:
<script>

    window.clickmagick_cmc = {

        uid: '[USERID]',

        hid: '[HID]',

        cmc_goal: 's',

        cmc_ref: 'main',

        cmc_amt: '7',

        log_upsell: 'accordion-SnYfnlBRNG:97:sixPackabs',

    }

</script>

<script src='//cdn.clkmc.com/cmc.js'></script>
Note: The code above is an example. You need to update the
buttonID, price, and ref values to be your own. If you use the code exactly as you see it above, you will have wrong date sent back to ClickMagick. Double check your code anytime you’re copying from these pages to make sure it’s updated for your informationThen, go back to Kartra and go to your first upsell page, go to Settings, then Tracking Codes, and insert the updated code into the <BODY> tracking code box.
What happens in this case, is as follows:
A visitor buys the front end offer and makes it to the upsell page.
Once on the upsell page, the $7 sale is recorded immediately.
If the buyer clicks on the button to add the upsell Six Pack Abs to their order, then the $97 sale is recorded.
If the buyer clicks on "No, thanks..." then the $97 sale isn't recorded.
Finally, if you have more than one upsell and downsell... you don't need to add a sales conversion code to every single page.
Just use your Click Tracking Code below to your other upsell and downsell pages, being sure to modify the code with your project’s name, the ID of your button, and the price of your upsell or downsell, and the name of it:
<script>

    window.clickmagick_cmc = {

        uid: '[USERID]',

        hid: '[HID]',

        cmc_project: 'NameOfYourProject',

        log_upsell: 'buttonID:price:name',

    }

</script>

<script src='//cdn.clkmc.com/cmc.js'></script>
That's it! When people purchase your upsells and downsells, they'll be tracked instantly inside of ClickMagick.
Step 1 - Tracking Your Front End Offer
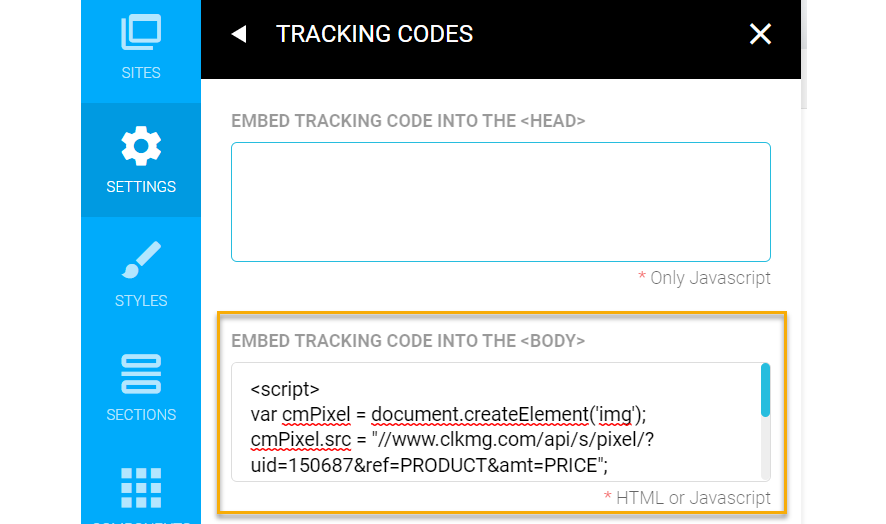
To track the front end offer, you'll want to add the Sales Pixel below to your thank you page.
Your Sales Pixel Below:
<script>

var cmPixel = document.createElement('img');

cmPixel.src = "//www.clkmg.com/api/s/pixel/?uid=[USERID]&ref=productName&amt=Price";

</script>

<noscript><img height="1" width="1" style="display:none"

src="//www.clkmg.com/api/s/pixel/?uid=[USERID]&ref=productName&amt=Price"

/></noscript>
Make sure you change
productName with the name of your product, and Price with the amount of your price.Once you have updated those values, add the sales pixel to your page in Karta by going to Settings, then Tracking Codes, and pasting the code into the <BODY> tracking code box.
Step 2 - Tracking Your Upsells And Downsells
You do this by tracking the click of the Yes button on your upsell or downsell pages.
Using the Sales Logging Code below and replacing it with the required ID of your button, price and ref value.
<script>

    var cmtools = {

        uid: '[USERID]',

        log_sale: 'buttonID:price:name',

    }

</script>

<script src='//cdn.clickmagick.com/misc/js/cmtools.js'></script>
To get the Button ID of the Yes button on your Upsell Page, visit your page in a new tab or window.
Right click on the button and click “Inspect”.
You'll be taken to the code for your button instantly which will look something like this:
What you’re looking for is that button id, which in this case is “
accordion-SnYfnlBRNG” Now you'd just update the
price and ref value for the upsell being sold.So for example, if your upsell is called Six Pack Abs and it sells for $97 you'd modify the line as shown below:
log_sale: 'accordion-SnYfnlBRNG:97:sixPackabs',The complete code on the first upsell page that sold a $7 product on the front end would look like this:
<script>

    var cmtools = {

        uid: '[USERID]',

        log_sale: 'accordion-SnYfnlBRNG:97:sixPackabs',

    }

</script>

<script src='//cdn.clickmagick.com/misc/js/cmtools.js'></script>
Note: The code above is an example. You need to update the
buttonID, price, and ref values to be your own. If you use the code exactly as you see it above, you will have wrong date sent back to ClickMagick. Double check your code anytime you’re copying from these pages to make sure it’s updated for your informationThen, go back to Kartra and go to your first upsell page, go to Settings, then Tracking Codes, and insert the updated code into the <BODY> tracking code box.
What happens in this case, is as follows:
A visitor buys the front end offer and makes it to the upsell page.
Once on the upsell page, the $7 sale is recorded immediately.
If the buyer clicks on the button to add the upsell Six Pack Abs to their order, then the $97 sale is recorded.
If the buyer clicks on "No, thanks..." then the $97 sale isn't recorded.
Repeat for your remaining upsells and downsells.
That's it!
When people purchase your upsells and downsells, they'll be tracked instantly inside of ClickMagick.
Article 761 Last updated: 12/05/2023 7:15:33 PM
https://www.clickmagick.com/kb/?article=761