How do I pass information from my Calendly form to ClickMagick?
When using Campaigns, there are a bunch of ways to capture visitor info in ClickMagick. This info – like visitors’ names, emails and phone numbers – will appear in Visitor Profiles, it can be sent back to your ad networks automatically to improve ad optimization, and it powers other features as well such as the tracking of recurring revenue.
Here are all the different ways to get your visitors’ info into ClickMagick ...
1. Automatically capture visitor info from forms on your site or online store
If you have an opt-in form, lead form, checkout form or any other type of form that you’re using to collect visitor information, ClickMagick can automatically capture this information and associate it with that particular visitor.
It’s simple to set up, just follow the instructions in the article below:
2. Pass visitor info to the tracking code on your pages
If you’re able to dynamically insert visitor info into the ClickMagick tracking code you have on any page, you can do that too. Here’s an example …
Say you have a Shopify store, you use the popular Checkify app for your checkout process, and you offer PayPal as a payment option. With this setup you would not be able to capture visitor info from the checkout form since it’s hosted by PayPal and you have no control over that page.
What you can do instead is use dynamic tokens provided by Checkify (and other similar checkout apps) to dynamically insert customer info directly into the clickmagick_cmc object of the tracking code on your “thank you” page visitors are redirected to after paying with PayPal.
Here’s what that might look like …
<script>

    window.clickmagick_cmc = {

        uid: '[USERID]',

        hid: '[HID]',

        cmc_goal: 's',

        cmc_amt:         '{{Checkify Order Amount}}',

        cmc_currency:    '{{Checkify Currency Code}}',

        cmc_ref:         '{{Checkify Order Number}}',

        cmc_firstname:   '{{Checkify First Name}}',

        cmc_lastname:    '{{Checkify Last Name}}',

        cmc_email:       '{{Checkify Email}}',

        cmc_city:        '{{Checkify City}}',

        cmc_postal_code: '{{Checkify Zip Code}}',

        cmc_country:     '{{Checkify Country Code}}',

    }

</script>

<script src='//cdn.clkmc.com/cmc.js'></script>
This example shows the use of Checkify dynamic tokens, but you’d obviously want to change those to the tokens provided by your checkout app. If you have the technical ability, you can also provide the values via Javascript or any other method that works for you.
There are a few more bits of info you can pass in not included in the example above. They are:
3. Pass an email, first name or last name to your URL
If you’re able to pass data through to your URLs, you can capture this data in ClickMagick using our cmc_email, cmc_firstname and cmc_lastname parameters. Here are a few examples of how you might do that …
Example 1 – Let’s say you’re using an iframe embedded form on your page, so ClickMagick can’t capture your visitor info. In this case, your form platform may offer the option to pass the email address, first name and last name to the thank you page.
On the link to your thank you page, you can add cmc_email=email_goes_here, cmc_firstname=first_name_goes_here and cmc_lastname=last_name_goes_here to pass that data back to ClickMagick.
You will need a Campaigns tracking code on your thank you page for this to work.
The redirect URL to your thank you page might end up looking something like this:
If you’re using a booking or form platform and you can pass this data to your thank you page, but can’t use these custom parameters, get in touch with our Helpdesk. We may be able to add a platform specific solution.
Example 2 – You can also send data from your CRM or autoresponder to the links in your emails using these parameters.
Let’s take a look at an example when using Active Campaign.
You can pass email, first name and last name using their personalization tags like so:
The personalization tags you need to use will be different for every autoresponder or CRM, so you’ll need to find what your platform uses to dynamically fill in the subscriber’s email and name.
As long as you have a Campaigns tracking code on the page you’re linking to, this information will be collected and added to the Visitor Profile for each visitor that clicks on the link in your email.
4. Pass an email and other visitor information to your Postback URL
If you’re an affiliate or someone who’s tracking conversions using Postback URLs, you can pass back a number of valuable pieces of visitor information to ClickMagick in your postback. You can pass back the visitor’s first name, last name, email address, phone, and mobile phone.
5. Automatically capture visitor info as a Clickbank vendor
If you’re a Clickbank vendor tracking your sales in ClickMagick using an Instant Notification URL (also known as a Postback URL) then you’re in luck – the process is automatic.
ClickMagick will automatically capture all of the visitor info that ClickBank provides.
If you want to start tracking your sales using Clickbank’s Instant Notification URL, follow the article below.
6. Use Calendly to pass an email, name and phone to your thank you page
To pass details from your Calendly booking form to ClickMagick, you will need to use a custom thank you page.
To set this up in Calendly, follow these steps:
1. In Calendly, select the event/booking you’d like to edit.
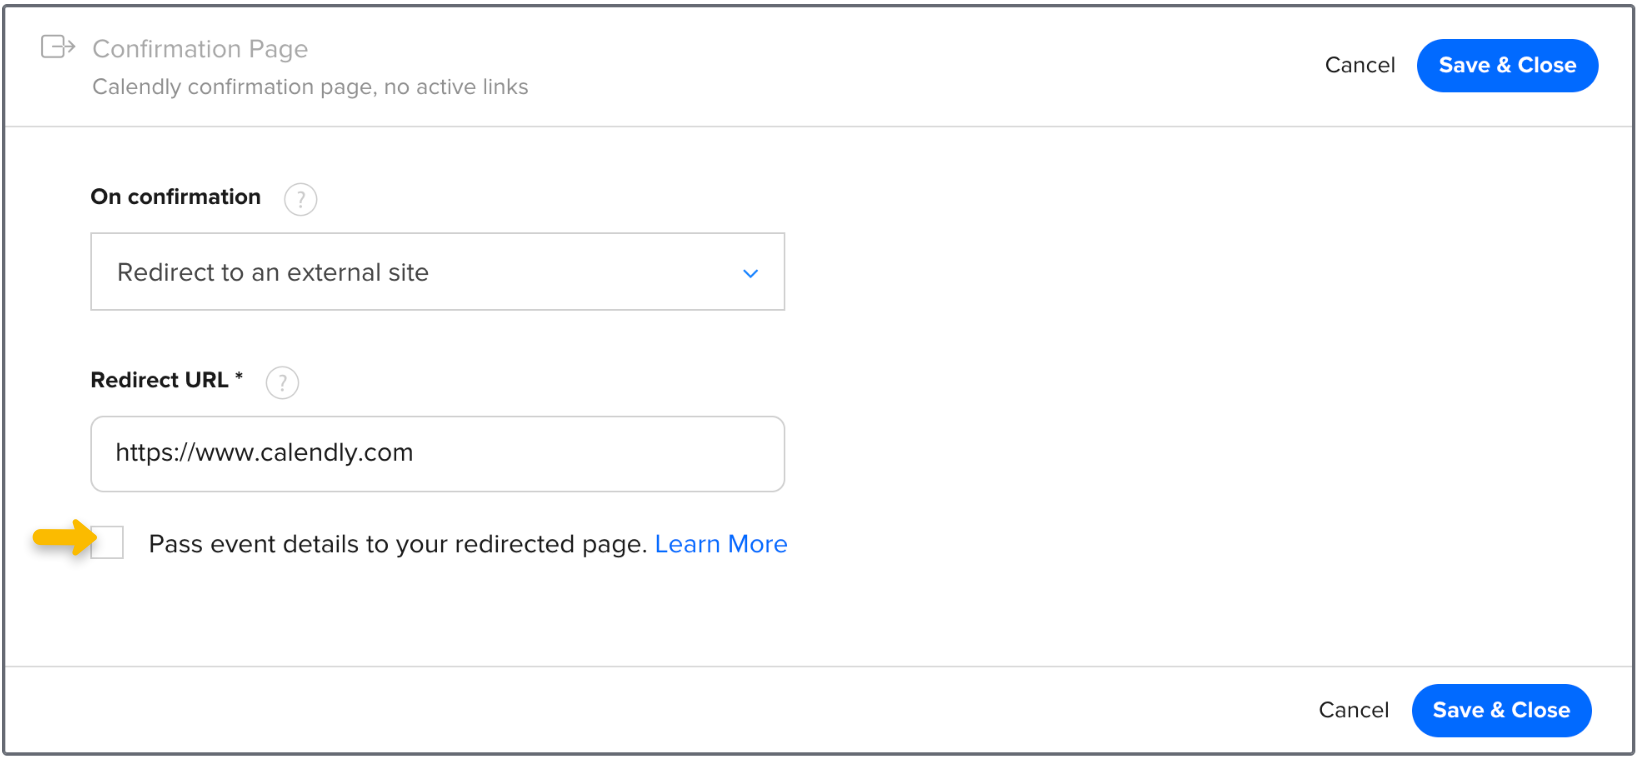
2. Open the “Confirmation Page” section.
3. Set “On confirmation” to “Redirect to an external site” and enter the URL of your custom thank you page in the “Redirect URL” section.
4. Check the box that says “Pass event details to your redirected page”.
That’s it! As long as you have a Campaigns click tracking code or conversion tracking code on your custom thank you page, the email, first name, last name and phone number will be collected from Calendly.
This information will be available in the Visitor Profile tool and can be sent back to your ad network using Audience Optimization.
The actual values collected from Calendly are invitee_email, invitee_first_name, invitee_last_name, invitee_full_name and text_reminder_number. This is all collected automatically by ClickMagick on your thank you page.
7. Use WebinarJam to pass an email, name and phone to your custom thank you page
If you’re using a custom thank you page, passing this information from WebinarJam to your thank you page is automatic.
As long as you have a Campaigns click tracking code or conversion tracking code on your thank you page, the email, first name, last name and phone number will be passed from WebinarJam to ClickMagick automatically.
If you’re using another platform and you’re not sure if you can collect this information, just get in touch with our Helpdesk and we’ll be happy to help.
Note: If you’re going to capture visitor info and share it with third-parties such as ClickMagick and your ad networks, you should ensure you have an appropriate Privacy Policy in place.
We will always do our best to use encryption and other technologies to ensure the customer info you send to us is safe and secure, but please remember that you're responsible for gathering any applicable consents for data collection when users visit your website or online store.
For the purposes of GDPR, you are the “data controller” and ClickMagick is simply a “data processor” acting under your direction.
Article 867 Last updated: 02/07/2024 3:39:36 PM https://www.clickmagick.com/kb/?article=867