|
What’s the best way to Split Test emails using Tracking Links?
It’s really easy to track an email split test with ClickMagick, but before we get into the explanation, you should read our short guide on how to track the performance of individual email messages first:
How do I track the emails I send to my list?
The rest of this explanation will assume that you’ve just read the article above and that you understand how you would use a tracking link with Sub-IDs like this ...
https://link-domain.com/email/Welcome/cta1In a tracking link like this, “Welcome” would be a short Sub-ID reminder of the Subject of the email, and “cta1” would be the first call-to-action (CTA) link in the message.
So, to split test a message, the straightforward way is the copy the original message and change the first Sub-ID in all the CTA links in the message:
https://link-domain.com/email/Welcome2/cta1

https://link-domain.com/email/Welcome2/cta2

...
Now that you have two versions of the message—your split-test—you would use your autoresponder to send one message to a part of your list and the other message to the rest of your list.
Once you send the messages, you will track the performance between the two split-test messages just like you would for any two messages—choose “Sub-ID Stats” from the Report menu to the right of the link.
With these stats, you can see the number of clicks each call-to-action link is getting …
… but that’s NOT enough to determine which message is performing better.
First, this example does not have enough clicks to determine a statistically valid winner. You would need hundreds of clicks before you could determine a true winner. Second, the numbers are meaningless unless you know the number of recipients each message was sent to.
Of course, if you sent one message to half the list and the other message to the other half, you wouldn’t need to know the number of recipients.
But, if you had a proven message that you were trying to make even better, and you sent your proven message to 90% of your list, and only 10% got your test message, that’s critically important!
To get an apples-to-apples comparison, you need to determine the “click-through rate” using this formula:
| Number of Unique Clicks | ||
| Click-Through Rate = |
|
|
| Total Number of Recipients |
By comparing the click-through rate for both messages, you can get a true idea of how each message is performing.
Note: One side effect of using the same tracking link for your email messages is that the “unique click” can be less important than the “total click” value. For example, if you send a message and a reader clicks on the call-to-action link, that first click is considered unique. However, for all future messages that use the same link, any clicks from your reader will show up in the Total Clicks column but not in the Unique Clicks column because the click isn’t unique to that link anymore—even if the Sub-IDs for the link are different. Just something to keep in mind ...
Advanced Technique—Using Dynamic Content
All autoresponders allow you to customize your email messages using “dynamic content”, to personalize your messages. You can use dynamic content to simplify your split-testing efforts.
Here’s how to use GetResponse as an example ...
When you create a new email in GetResponse, you must enter a “message name” that is not included in the message. (This is like the “friendly name” of a tracking link.) Although that name is not normally included anywhere in the message, you can insert it in the message if you want to by using a “dynamic content token” that looks like this:
{{CONTENT "message_name"}}If you use this token as part of your link, you can generate unique Sub-IDs for every call-to-action:
https://link-domain.com/emails/{{CONTENT "message_name"}}/cta1For example, suppose the Subject line of your email is “Mason Bees Pollinate Like Crazy!” Using GetResponse, you could set your message up like this:
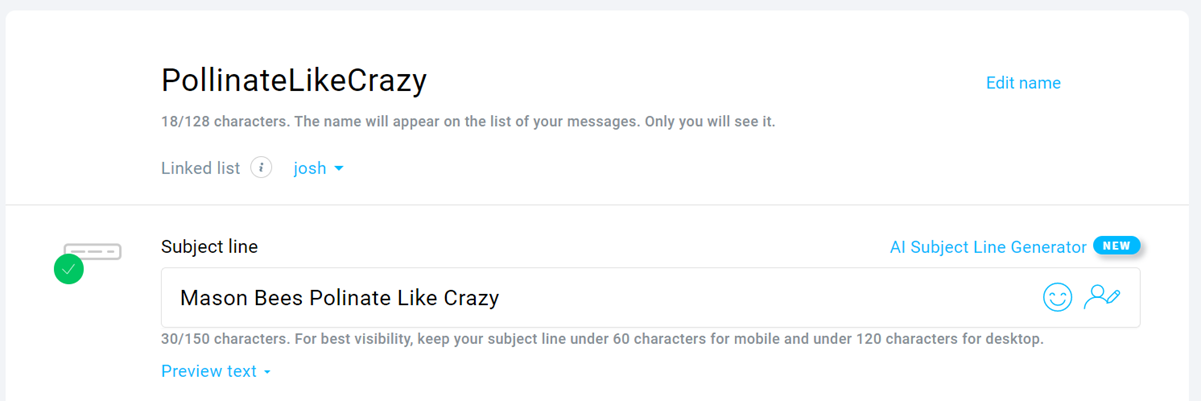
That setup would dynamically create links like:
https://link-domain.com/emails/PollinateLikeCrazy/cta1You can use this technique with most autoresponders, but it’s done completely differently for each one.
If you want to use this technique with your links and you’re not using GetResponse, you’ll need to review the documentation for your autoresponder or ask their support desk for help—remember, this is their area of expertise, not ours.
You can always search online for the phrase “dynamic content autoresponder name”:
dynamic content AWeber

dynamic content MailChimp

...
Look for search results about how to “personalize” your messages.
Caution: Be sure the “message name” part of the link contains only valid Sub-ID characters. To be super-safe, stick to letters, numbers, dashes, and NO spaces. You might be tempted to use the dynamic content token for the message’s Subject line (e.g.,
*|MC:SUBJECT|* in MailChimp) to insert the Subject into your link. Don’t do it—that’s super risky! You will almost certainly have spaces and other illegal Sub-ID characters in your Subject lines that will break your links.Article 279 Last updated: 03/16/2023 5:41:32 PM
https://www.clickmagick.com/kb/?article=279