|
What are all these additional settings for rotators?
This article explains each of the Advanced Settings tabs when you’re creating or editing a rotator or rotator URL. These tabs are optional and not necessary for you to start promoting with your rotator
Click on each tab below to learn more about what each of them do:
Here you can add tracking pixels to your Rotator so that whenever the link is clicked on, the pixel will fire.
Please note that in 2023, third-party tracking pixels are no longer viable for tracking. Due to industry changes and privacy restrictions in all major browsers, the only pixels that will work reliably here are ClickMagick Tracking Pixels.
When setting up a rotator you can enter both a custom “start” and “finish” message that will be optionally sent to users when their traffic starts, and again when delivery is completed.
To set up these messages, just create or edit a rotator and select the “Emails” tab. There you’ll be able to enter a custom email Subject, Body and Reply To address for both the “start” and “finish” messages.
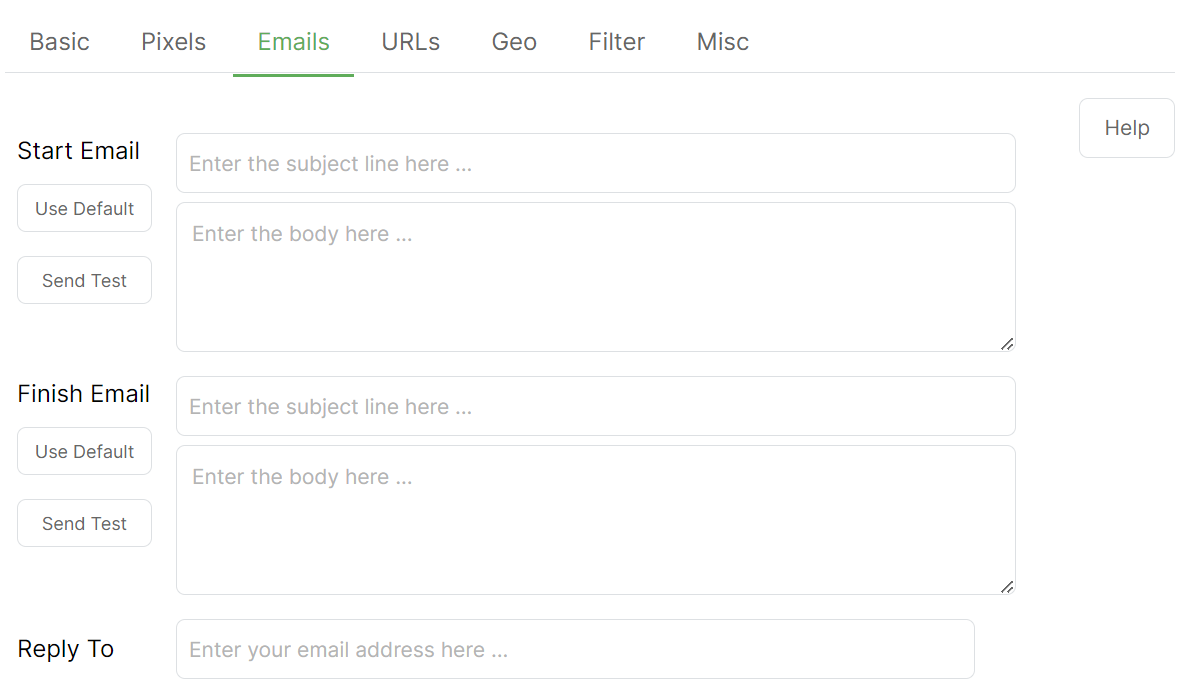
For the body, note that you can enter either a plain text message (generally more personal) or a fancy HTML email message (possibly more “professional”) depending on your business and what you prefer.
If you do want to use HTML emails, just create the HTML content you want to use in your favorite editor (via your autoresponder, page builder, etc.) and then simply cut and paste the HTML into the Body area.
Either way, there’s a special [stats_url] token that you’ll probably want to use in your emails.
It does just what you’d imagine – wherever you use this token in your emails it will be replaced with the unique Public Stats URL that your client can use to check their stats.
When you’re done, be sure to click the “Send Test” link which will instantly send a copy of the email to your email address so you can make sure it looks the way you want.
Once you’ve set up your rotator emails, you can start using them by simply entering the optional “Client Email” in the Notify tab of the rotator URL when adding individual clients or URLs to your rotators:
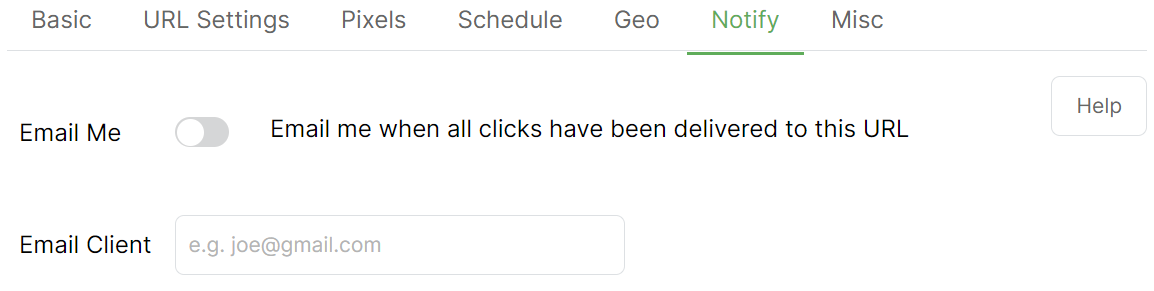
If you enter the client’s email address then your custom messages will be sent, and if you don’t enter an email address, then no emails will be sent. Simple as that!
If you want to be notified when your client has received all their clicks, choose Yes for the “Email Me” option in the Notify tab of the rotator URL settings.
Note: Because we’re sending these emails on your behalf, we do need to monitor them and we review each custom email that you set up. Hopefully it goes without saying but please do not attempt to use our system to send any “spammy” or otherwise inappropriate emails. Thanks!
Mobile URL and iOS URL
You can easily identify mobile clicks by setting the optional Mobile and iOS URLs on the URLs tab for any link.
When ClickMagick receives a mobile click, it first checks to see if the click is from an Apple iOS device like an iPhone, and if so, the click is re-routed to the URL specified in the iOS URL setting if there is one.
If the iOS URL is not set, or the click is from any other mobile device, the click is re-routed to the Mobile URL, again if there is one, otherwise, the click is processed normally.
Note: By default, visitors using tablets like an iPad will be treated as if they’re on a desktop PC. This is usually what you’ll want because their screens are usually large enough to be treated as a “regular” visitor. If you’d rather have tablets be treated as mobile devices, you can change this setting in the Traffic settings of your Account Settings.
Please note that these settings are analyzed, calculated or applied once per minute, NOT on every click. You can add up to 10,000 URLs per rotator.
| Position | This tells ClickMagick where to position the URL in the list of URLs. The two most common settings are “1”, which tells ClickMagick to put the URL in the top position so that it will start receiving clicks before any other URL. The other common option is leaving the “position” blank which tells ClickMagick to put the URL at the end of the list of URLs, giving it the lowest priority of all URLs in the list. |
| Max Clicks | If specified, this is the max number of unique clicks that a URL can receive. Once it reaches this amount it will be automatically paused. |
| Max Daily Clicks | If specified, this is the max number of unique clicks per day that a URL can get. The number of daily clicks delivered resets to 0 at midnight in the time zone selected in your User Settings. |
| Bonus | If specified, this is the percentage of Max Clicks to over deliver. If Max Clicks is set to 100 and Bonus is set to 10%, the system will actually send 110 unique clicks. |
| Min T1 | If specified, this is the minimum Tier 1 Traffic Ratio that’s allowed for this URL. For example, say you sell solo ads and you guarantee your clients at least 80% Tier 1 clicks. Just set this to 80 and the system will ensure they get at least an 80% T1 ratio automatically. *See Note at end |
| Max T1 | If specified, this is the maximum Tier 1 Traffic Ratio that is allowed for this URL. Used together with the Min T1 setting above you can achieve the T1 ratios you want for each link with pinpoint accuracy. *See Note at end |
| Min Mobile | If specified, this is the minimum amount of mobile traffic this URL will receive on a percentage basis. So if you want a URL to receive at least 30% mobile traffic, you’d just enter 30. If you wanted to receive only mobile clicks, you would enter 100. *See Note at end |
| Max Mobile | If specified, this is the maximum amount of mobile traffic this URL will receive on a percentage basis. So if you want a URL to receive no more than 30% mobile traffic, you’d just enter 30. If you didn’t want to receive any mobile clicks at all, you would enter 0. *See Note at end |
| Weight | When using a Sequential rotator, this allows you to specify that one URL should get more traffic than the others. If you want it to receive 3X as much traffic as the other URLs, you’d select a Weight of 3 for example. This is normally used in conjunction with ad co-ops. |
Note: When delivering clicks, minimum and maximum percentages are maintained on a click-by-click basis.
For example, if you have a minimum T1 value of 90% and a click comes through, ClickMagick will balance the T1/non-T1 ratio at 90%. This means that even though a click could be sent to the URL, if won’t be if it would throw off the ratio.
Take this real world example: You’re delivering 1,000 clicks with a 90% minimum T1. That means the URL could accept up to 100 non-T1 clicks. However, if the first 100 clicks were all non-T1 clicks, ClickMagick would not deliver all 100 to the URL because it would throw the 90% ratio too far off.
This is the way solo sellers insisted on having it, so that a new solo wouldn’t start off with 100 non-T1 clicks at the beginning of a delivery. The delivery will be balanced.
If you’re unsure what the difference is between Tier 1, 2, and 3 clicks, you can review this article:
Here you can set specific Geo-targeting options for your tracking link – countries that you can include or exclude from your targeting.
Many times an offer you want to promote only accepts traffic from certain countries – and any other traffic you send through your referral link is just wasted.
Or maybe you’ve just figured out that a particular offer converts best for users in certain countries and you’d rather send users in other countries to a different offer rather than just “wasting” that traffic.
Or perhaps you sell solo ads and your clients only want clicks from certain countries …
“Geotargeting” is the solution in all these scenarios.
Just open the link or rotator name you want to set up geotargeting for and click the “Geo” tab.
Here you have two choices: You can specify only the countries you want clicks from, or only the countries that you don’t want clicks from (often called “geoblocking”). Any clicks that come in that don’t match your settings will automatically be re-routed to your “Backup URL.”
This will maximize the value of your traffic by sending each user to the offer most likely to result in a positive outcome—whether that’s an opt-in, a lead or a sale.
Note: If a country you want to geotarget isn’t listed, let us know and we can add it in literally 5 seconds.
Only the most popular countries that users target are listed, because no one geotargets Botswana, and a list of 246 countries is just a pain to work with.
Only the most popular countries that users target are listed, because no one geotargets Botswana, and a list of 246 countries is just a pain to work with.
Tip: If you’re interested in learning more about geoblocking, see this article on the topic:
This tab allows you to set the rules for the 6 types of “suspicious” or potentially bad clicks you might want processed differently as compared to regular clicks from real people surfing the web normally.
And for each of them, you can tell ClickMagick to “flag” the clicks, block the clicks, or do nothing special with the clicks and process them normally.
You can choose these settings in the Advanced Settings of any link or rotator.
What Are the 6 Types of Potentially Bad Clicks?
Now that you’re an expert on flagged clicks and blocked clicks and how they affect your statistics, let’s take a look at the 6 different types of potentially “bad” clicks.
Note: Please notice that 5 out of the 6 can be generated by real humans, so don’t assume when looking at your Flagged or Blocked clicks that you’re always looking at non-human clicks 100% of the time!
| Abuser | An “Abuser” is a web surfer who has exhibited abnormal and highly suspicious click patterns, for example loading the same tracking link 30 times in one minute or clicking 30 different tracking links in one minute. If you are a “solo ad” seller, you’ll want to read the following article on how you should handle clicks from “Abusers”: Can you explain in more detail what an "Abuser" is? Because “Abusers” are actual people, ClickMagick processes these clicks normally—by default—and does NOT flag or block these clicks. It’s up to you to decide how to handle them. Generally speaking, though, we recommend that you do set Abusers to the “Flag” or “Block” setting, especially if you’re selling solo ads. |
|
| Anon | Anonymous refers to users who are hiding behind an anonymous proxy, Virtual Private Network, TOR, etc. And more often than not they are people who are trying to artificially inflate your click counts, as the overwhelming majority of Internet users do NOT fall into this category. But because “Anon” clicks ARE from real people, ClickMagick does NOT flag or block these clicks by default. It’s up to you how you want to handle them. If you want to flag or block anonymous clicks—which is generally recommended for solo ad sellers—you can do this in the Advance Settings of your link or rotator. |
|
| Bot | A bot is any type of automated program or software that accesses your tracking links or rotators. Bots can be both innocent like a link monitoring system, or malicious like a script used to generate fake clicks. Either way they mess up your stats. By default, ClickMagick will flag bot clicks and separate them from your stats automatically – but please note that in a relatively tiny percentage of cases bot clicks can also come from machines used by real humans. For example, if a user’s home computer is infected with malware or is part of a “bot net”, this user’s machine will generate “bot” clicks – and if you flag or block these clicks you would also be flagging or blocking any legitimate clicks from the user themselves. The odds of this happening are so small that it’s not really something you have to worry about, but it’s certainly something that you should be aware of. |
|
| Spider | Spider is a piece of code that search engines use to index the web, following links in pages as they find them during the indexing process. These spider “clicks” are generally innocent, but they don’t represent real clicks from real users and they mess up your stats. By default, ClickMagick will flag spider clicks from your stats automatically. |
|
| Server | This represents a “click” from a known web server or hosting company. The overwhelming majority of the time these are scripts used by scammers to generate fake clicks. By default, ClickMagick will flag “server” clicks from your stats automatically – but please note that in a relatively tiny percentage of cases server clicks can also come from machines used by humans. For example, if a person has used a web server to set up their own VPN (virtual private network) to surf the web anonymously, these legitimate human clicks could be identified as “server” clicks instead. The percentage of people who do this type of thing are so tiny that it’s not really something you have to worry about, but it’s certainly something that you should be aware of. |
|
| User | These are the IPs or IP ranges that you, the user, have manually added on your IP Manager page. By default, ClickMagick will flag these clicks automatically. |
Note: VPN requests originate from a server, so if our system hasn’t yet learned about a particular VPN IP address, the click will be classified as a Server click instead. While this occasionally does occur, it’s quite rare –and most importantly – it doesn’t happen often enough to meaningfully affect the accuracy of your stats.
In addition to our own systems, ClickMagick uses the most accurate 3rd-party IP databases available, and our system gets smarter at detecting VPN IPs every day … but if you find that a VPN is being classified as a Server you’re welcome to let us know and we’ll investigate and update our database if necessary.
In addition to our own systems, ClickMagick uses the most accurate 3rd-party IP databases available, and our system gets smarter at detecting VPN IPs every day … but if you find that a VPN is being classified as a Server you’re welcome to let us know and we’ll investigate and update our database if necessary.
Now, for each type of potentially bad clicks described above, you have 3 choices of what to do with them:
| 1. | Flag – Flagging will send these clicks through your link or rotator as normal, but their clicks counts will be separated from your main stats. You can view these clicks any time by clicking on the number in the FC column. Clicks from “Abusers” are flagged for 24 hours after their last abusive click. All other types of clicks are flagged indefinitely. |
| 2. | Block – This will block the click from being processed, and the “click” will be sent to a generic error page. You can view blocked clicks on the Public Stats page of any link, or the Shared Stats page of any rotator URL. Note: Be aware that even if you set your Bot settings to Block, ClickMagick can’t block critical bots from major companies like AWeber, Google, Facebook, Bing, etc. or their link verification tests will fail and cause you massive problems. When ClickMagick sees these special bots, they are flagged instead of being completely blocked.
|
| 3. | Nothing – Don’t do anything out of the ordinary. Treat these clicks just the same as real clicks. |
You can choose whether to flag or block or these clicks using the “Bad Clicks” settings in the Advanced Settings of each tracking link or rotator.
You can also specify default settings in the “Click Auditing” section of your Account Settings which will be used whenever you create a new tracking link or rotator.
Caution: Most other click tracking systems do NOT differentiate clicks from real people and clicks from bots, search engine spiders, anti-virus programs, link monitoring systems, etc.
If you’re comparing what you see in your ClickMagick account with the stats from another tracking system, you can see some major discrepancies if the other system treats these fake clicks as “real” clicks.
If you’re comparing what you see in your ClickMagick account with the stats from another tracking system, you can see some major discrepancies if the other system treats these fake clicks as “real” clicks.
You can schedule your individual rotator URLs to have a start date and end date, as well as being able to limit the times traffic is delivered to this URL every day.
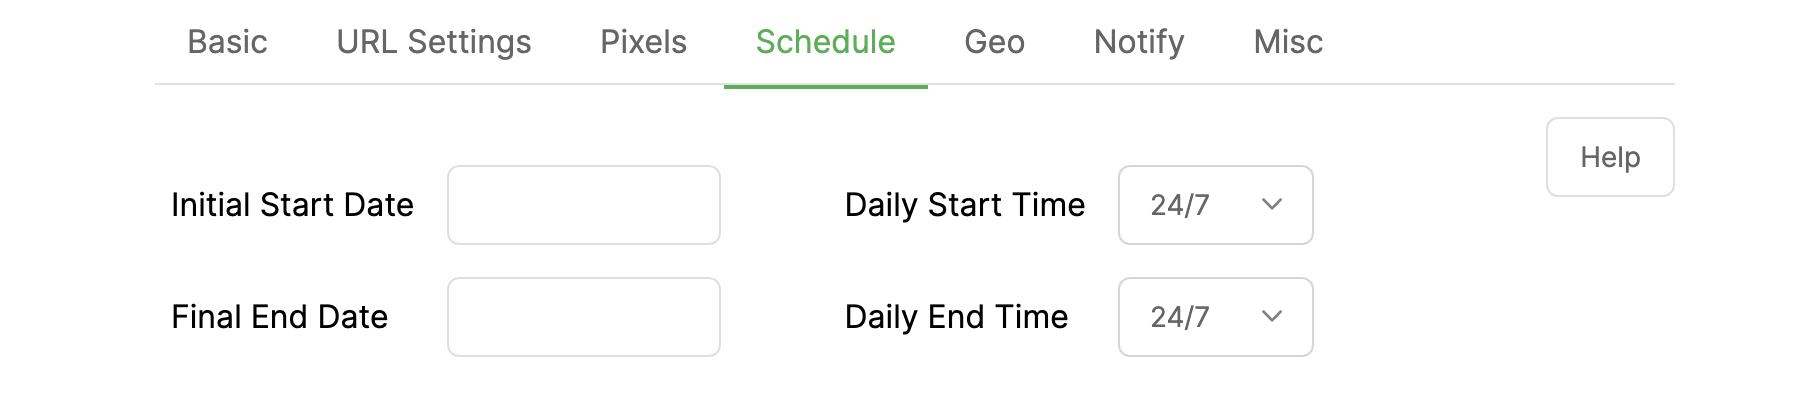
If an Initial Start Date and Initial End Date is specified, the system will not send any traffic to a URL until the Initial Start Date, and it will automatically stop sending traffic once the Final End Date and time arrives, regardless if Max Clicks has been reached.
When you set the Initial Start Date and Final End Date, that specific rotator URL will automatically be “Active” for that time frame, and “Paused” for every other time period outside of the time frame that you specified.
If you click on the “Status” dropdown, you can manually pause or unpause that rotator URL:
To delete your specified time frame, just select the date you have in the Initial Start Date or Final End Date and just hit delete.
You can also set a daily schedule, so your rotator URL will only be “Active” for a certain period of time every day.
For example, if you only want your rotator to deliver traffic to this URL from 9am – 5pm daily, you can set things up like so:
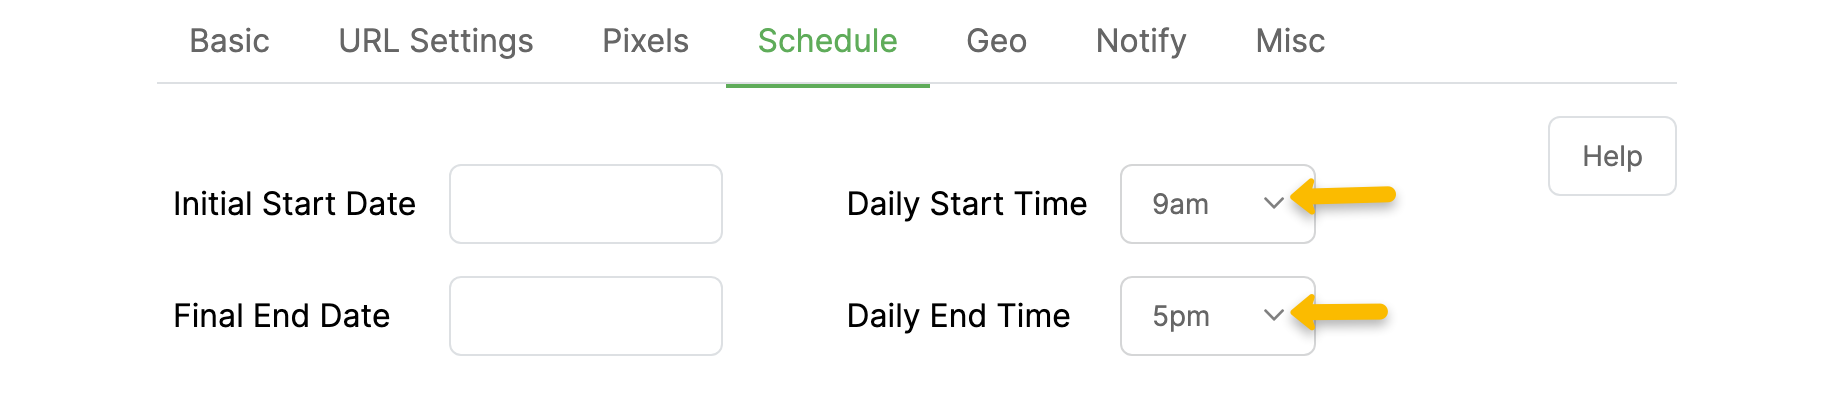
If you want traffic to be delivered at all times during the day, just set both the Daily Start Time and Daily End Time to “24/7”.
Note: All times selected are in your account time zone. If you want to check or change your account time zone, you can do that in your Account Settings.
That’s it!
Blank Referrers
If you want to hide or “blank” your referrers so the sites you’re sending traffic to can’t tell where it’s coming from, you would just toggle on “Yes” for this option.
When your clicks are redirected, your referrers will be blanked.
The referrers will NOT be blanked in your own stats pages. This is intentional so that you’ll always know where your traffic is coming from.
Note: Blanking your referrers requires an extra redirect which technically increases the time it takes for the user to see the page you’re sending them to. Users should never notice this, be we thought we’d mention it.
Caution: Please do NOT enable this feature unless you understand the purpose for it, and you have a good reason for using it.
Note: Firefox versions 67 and 68 have a bug that broke the ability to blank the referrer for visitors using those two versions of that browser. Firefox browsers released before version 67 work fine and versions of Firefox 69 and newer appear to have this problem fixed. Unfortunately, there is nothing we—or any other tracker—can do to workaround the Firefox 67 and 68 bug.
Skip URL Check
Toggling this option “On” will skip the URL check for the primary URL when you try to save a tracking link or rotator.
To give you a little more information about what the URL check is about, whenever you set up a tracking link or add a URL to a rotator, ClickMagick will check to make sure that the URL is valid and working properly.
This is to prevent you from entering URLs with typos, or URLs that just aren’t working properly due to a technical problem – both of which would waste your clicks.
Keep in mind that sometimes a link may stop working for just a minute or two. So unless you get an error code that starts with a 4 – codes 401, 403 or 404, which indicate a serious problem that’s not going to fix itself – the first thing to do is just wait a sec and try adding it again.
Obviously, you’ll also want to check the URL for typos, missing “
www”, or any other obvious problems.Also, please understand that just because a link works for you, it does NOT mean that it works for everyone.
Many problems result in some people being able to access a link, with lots of others who can’t.
Here’s a list of the most common errors you’ll see, and a brief description of what they mean.
401 Authorization Required / Unauthorized
This URL requires authentication i.e. a username and password, so our monitoring system is unable to access it.
403 Forbidden
The server hosting the URL you’re promoting is operational but it refused our request. This could be due to a configuration error.
404 Not Found
The requested URL does not exist.
500 Timeout / Timed Out
The URL took longer than 20 seconds to load (and might as well be down!)
500 Bad Hostname
Generally means the URL/domain is not configured properly, usually due to a DNS problem.
500 Connection Refused
The server refused the connection. This is usually due to some type of configuration problem.
500 No Route To Host
This is a configuration problem with the server hosting the URL you’re promoting.
500 Internal Error / Server Error
The server hosting the requested URL responded with a generic error message.
Article 672 Last updated: 07/30/2023 8:30:23 AM
https://www.clickmagick.com/kb/?article=672