|
How do I send conversion data to Mondiad?
You can send your conversion data to your native ad platform by setting up a webhook. This will just takes a few steps, and will allow you to send your conversion data back to the network so that you can optimize your marketing.
Select the ad network you are working with to learn more.
While RevContent doesn’t provide webhooks to track conversions, they give you a unique tracking pixel for each campaign you run, and that can be used to track your conversions. Instead of using your complete pixel code, you’ll just use the URL in the code.
Here’s how to set it up:
| 1. | Set up your landing page to use Campaigns by making sure you have your Click Tracking Code on your landing page. For steps on how to set up Campaigns with your landing page, checkout the article below: How to track affiliate sales using a landing page? |
| 2. | Set up your UTM powered URL that you will use in RevContent and then set it as the URL to send traffic to. |
You can use RevContent’s tracking tokens in your UTM powered URL shown below:
|
identifies the Topic where click came from |
|
numerical identifier of the campaign clicked on |
|
numerical identifier of the content clicked on |
|
city of the user clicking on the content |
|
state of the user clicking on the content |
|
country of the user clicking on the content |
|
numerical identifier of the widget the click occurred on |
| Others | Click here for RevContent's full set of parameters |
| 3. | In your RevContent account, you’ll want to navigate to the Campaigns Settings. Scroll down until you see “UTM Tracking” then click on the Gear Icon and add Custom Key Value Pairs. 
Custom Key: cmc_tidCustom Value: {conversion_uuid}Then click the button to build your tracking code. 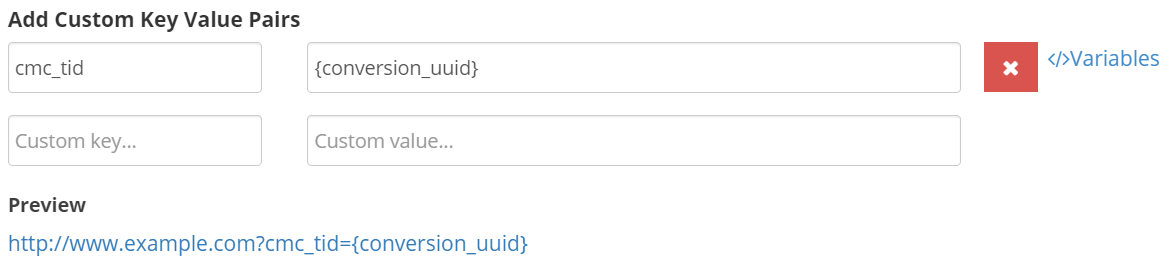
To create your webhook you’ll need three parameters. Your API access key, a uuid, and an amount. To get your API Access Key, head to your account settings and scroll down the page until you see Widget API Key: 
Save this key |
| 4. | Open the Webhooks tool by clicking on “Webhooks” in the Campaigns Tools menu. Click “Add Endpoint" to create a new webhook. Choose the project that you're working on, update the utm_source and utm_campaign values from the drop-down menu, then set the Conversion Type to Sales.The URL that you will use for the endpoint is below, but in order for it to work you need to replace <your_api_key> with the API key you saved in the previous step.https://trends.revcontent.com/api/v1/conversion.php?api_key=<your_api_key>&uuid=[cmc_tid]&amount=[cmc_amt]Paste your updated URL into the Endpoint URL box. 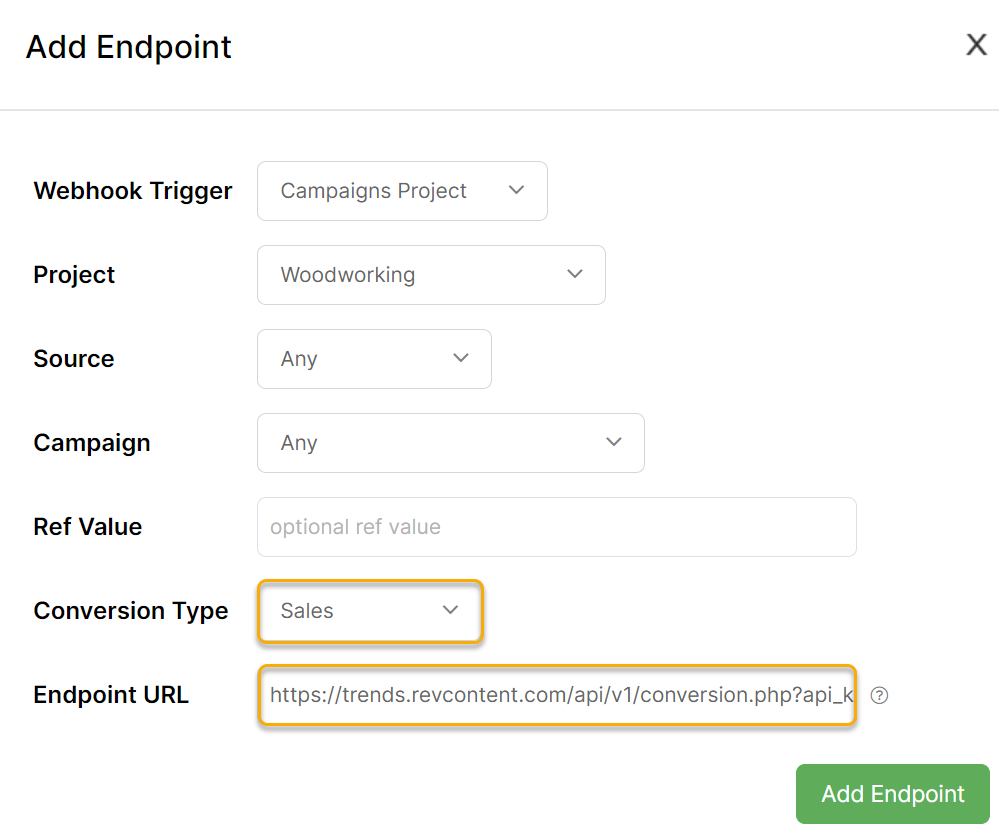
|
| 5. | Click on Add Endpoint. |
Taboola supports webhooks, so you have the ability to send conversion data back to Taboola.
Here’s how to set it up:
| 1. | Set up your landing page that you’ll use with Taboola. |
| 2. | Set up your campaign and ad in Taboola, and then send traffic to the URL ending with UTM parameters:https://example.com?utm_source=taboola&utm_medium=native&utm_campaign=example&cmc_tid={click_id}{click_id} is the unique Taboola token that ClickMagick will send back to them in the webhook payload.Note: You can use any combination of UTM parameters you want, but you must make one of them use the Taboola token mentioned above.
|
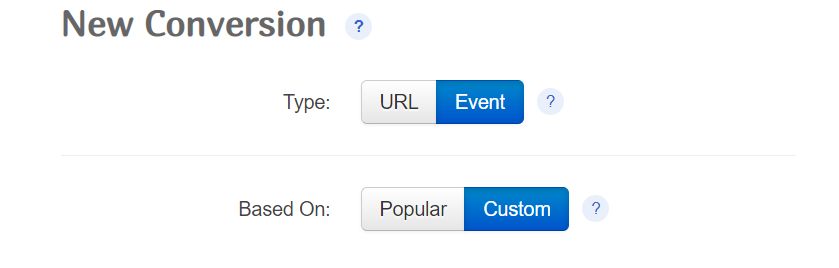
3. In your Taboola account, you’ll want to go to the Tracking tab and create a new conversion.
For type select Event:
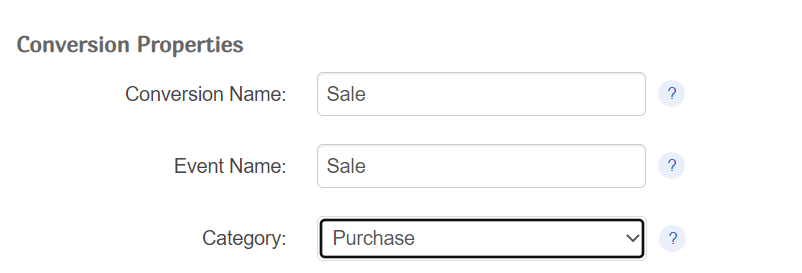
Give your conversion a name such as Action, Engagement or Sale and select the Category that best describes your conversion.
| 4. | Open the Webhooks tool by clicking on “Webhooks” in the Campaigns Tools menu. Click “Add Endpoint" to create a new webhook. Choose the project that you're working on, update the utm_source and utm_campaign values from the drop-down menu, then set the Conversion Type to Sales. Set the Endpoint URL to: For Actions: https://trc.taboola.com/actions-handler/log/3/s2s-action?click-id=[cmc_tid]&name=your_conversion_nameFor Engagements: https://trc.taboola.com/actions-handler/log/3/s2s-action?click-id=[cmc_tid]&name=your_conversion_nameFor Sales: https://trc.taboola.com/actions-handler/log/3/s2s-action?click-id=[cmc_tid]&name=your_conversion_name&revenue=[cmc_amt]Be sure to replace your_conversion_name with the name of the conversion you created in Taboola.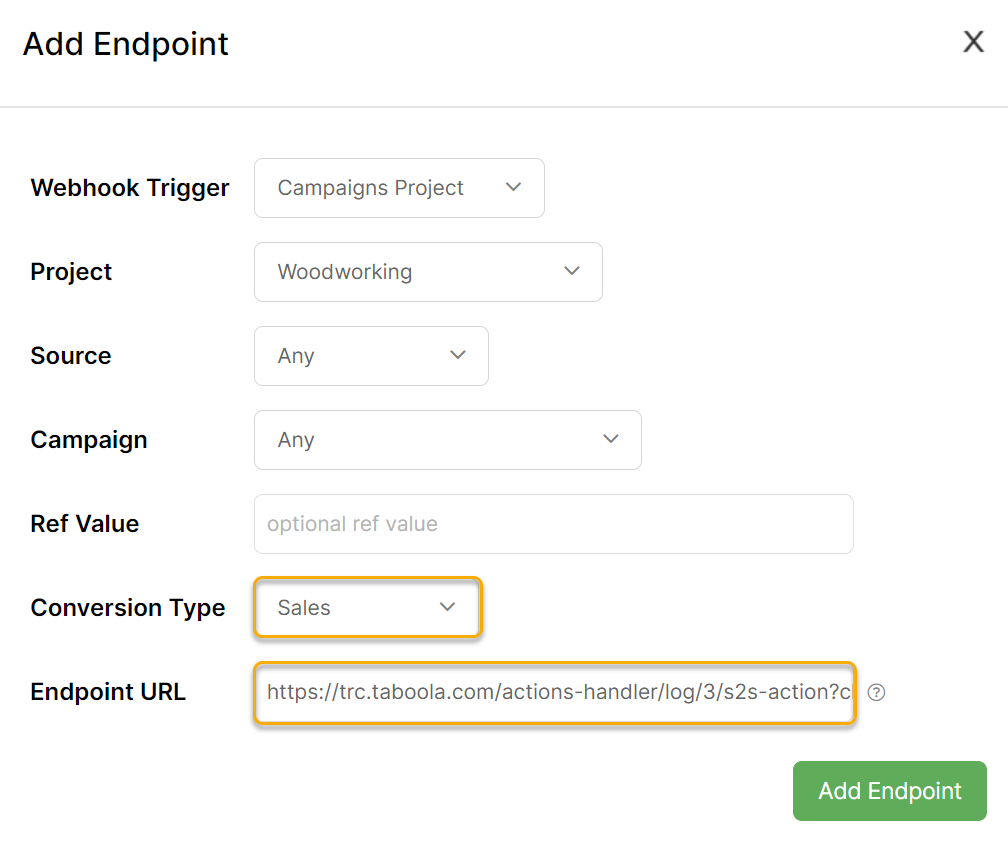
|
| 5. | Click on Add Endpoint. |
To set up a webhook between MGID and ClickMagick, you first need to set up MGID so that it can receive a ClickMagick webhook, and then you need to set up the actual webhook within ClickMagick.
First, let’s set up the MGID part. It takes just a few steps once you’ve already set up your campaign. If you haven’t already set up an MGID campaign, do that first and make that sure it works.
Now let’s add ClickMagick tracking to your campaign:
| 1. | Open your campaign settings by clicking on the “gear”  icon to the right of your campaign in the campaign list. icon to the right of your campaign in the campaign list.Next, scroll down to the “Conversion Sensors” section. For reference, the next 3 steps are numbered in this screenshot: 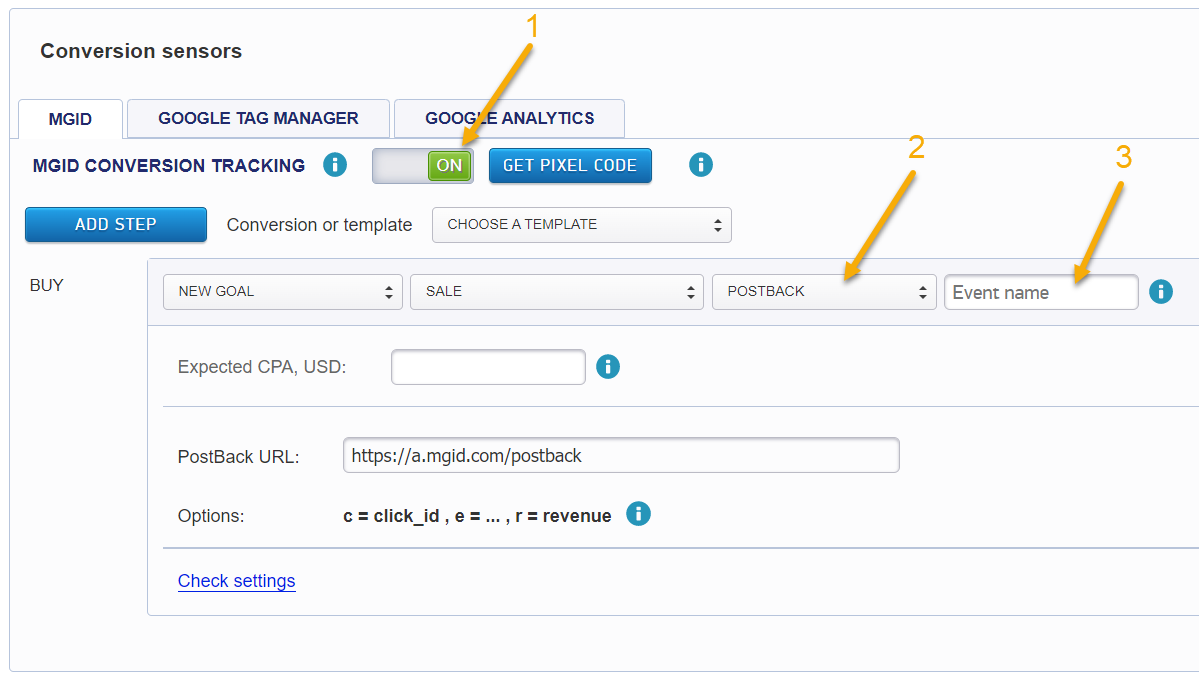
|
|
| 2. | Make sure that “MGID CONVERSION TRACKING” is set to ON. |
|
| 3. | For the “Goal Type”, select “POSTBACK”. If you are asked to set a value. Enter this:click_id={click_id}Click “OK”. |
|
| 4. | In the box where it says “Event name”, enter something unique that relates to this campaign in some way. For example, if you’re selling golf clubs, you might use “golfclubs”. If that’s not unique enough, add some random numbers on the end such as “golfclubs82573”. Use only letters and numbers and be extra careful to not use any spaces in this name. Write down or copy exactly what you just entered in the “Event name” field. You will need this in just a minute when you set up your webhook in ClickMagick. |
|
| 5. | Double-check all your settings and click the Save button. |
That’s it for MGID!
Now let’s set up the webhook in ClickMagick:
| 1. | Create a UTM Powered link for your landing page you’d like to promote. You want the cmc_tid to be {click_id}It should look something like this: https://example.com/?utm_source=mgid&utm_medium=native&utm_campaign=example&cmc_tid={click_id}Note: You can use any combination of UTM parameters you want, but you must use the
cmc_tid for the MGID token mentioned above.If you need help with this step, follow the instructions here: ClickMagick Campaigns - Getting Started |
|
| 2. | Open the Webhooks tool by clicking on “Webhooks” in the Campaigns Tools menu. Click “Add Endpoint" to create a new webhook. Choose the project that you're working on, update the utm_source and utm_campaign values from the drop-down menu, then set the Conversion Type to Sales. Set the Endpoint URL to: Be sure to replace youreventname with the “Event name” you created a moment ago in MGID. For example, if you used “golfclubs82573”, your link would look like this:https://a.mgid.com/postback?c=[cmc_tid]&r=[cmc_amt]&e=golfclubs82573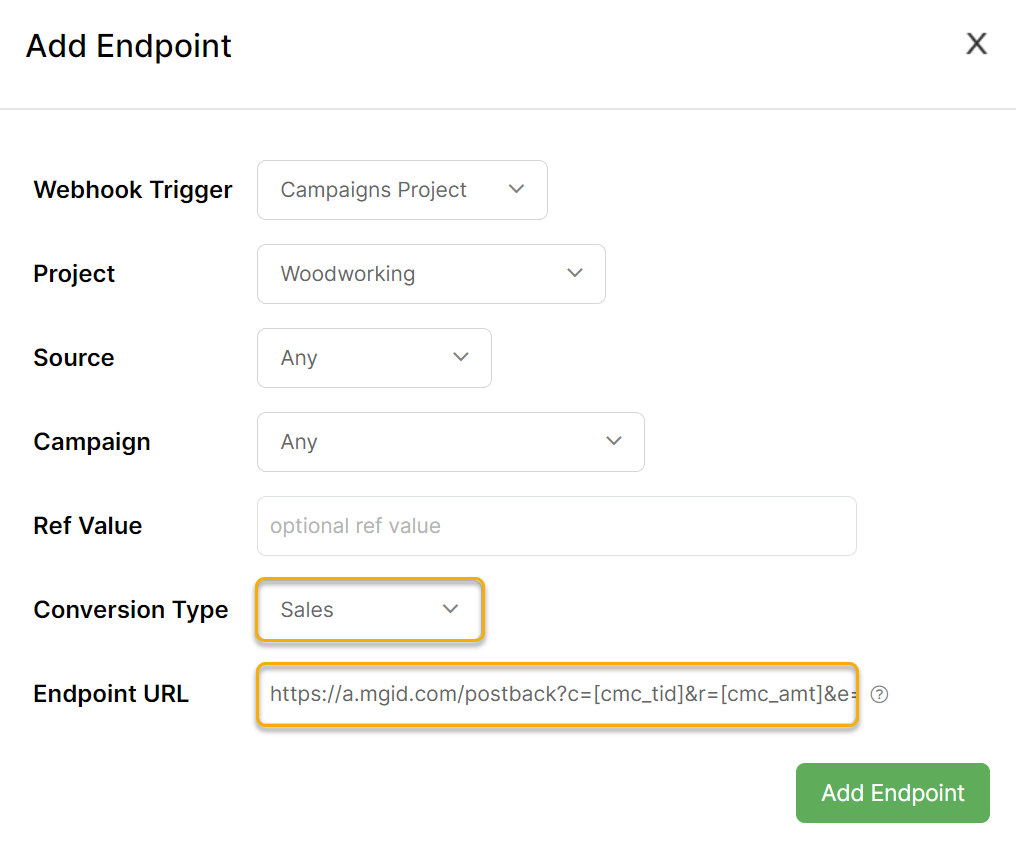
|
|
| 3. | Double-check your settings and save your webhook by clicking Add Endpoint |
With this setup, whenever anybody clicks on an MGID ad and a sale is made, the sale will be recorded in Campaigns and then ClickMagick will report the sale back to MGID.
Outbrain supports webhooks, so you can send back conversion data to Outbrain.
Here’s how to set it up:
| 1. | Create a UTM Powered URL using the Campaign URL Builder that you’ll use with Outbrain. |
| 2. | Set up your campaign and ad in Outbrain then add your UTM Powered URL to the URL section of your campaign. You can find this setting by clicking on the Content link right next to the Settings link of the Create Campaign settings:
You can add many different URLs to an Outbrain campaign as you’d like. |
| 3. | Edit your Campaign settings, and scroll down to the Tracking section. In the Tracking Code entry, add the unique click ID token for Outbrain as shown below:Outbrain will automatically add the actual click ID and send it to ClickMagick. 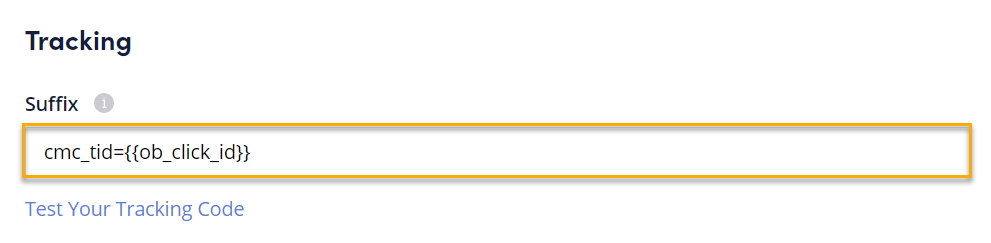
|
Now you need to create a custom conversion within Outbrain.
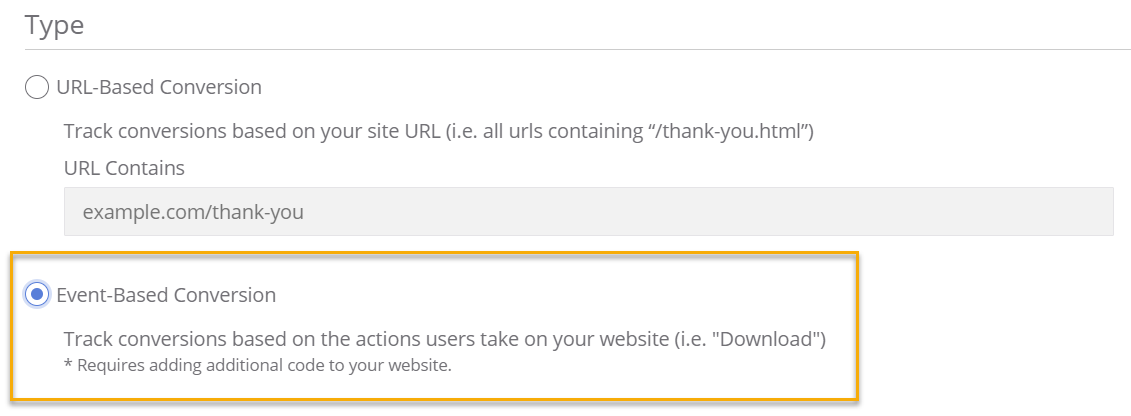
4. Within Outbrain, click on the “Conversions” tab on the left, and then create a new conversion.
For the Type select Event Based Conversion.
Give your Conversion a name such as Action, Engagement or Sale and select the Category that best describes your conversion.
| 5. | Open the Webhooks tool by clicking on “Webhooks” in the Campaigns Tools menu. Click “Add Endpoint" to create a new webhook. Choose the project that you're working on, update the utm_source and utm_campaign values from the drop-down menu, then set the Conversion Type to Sales. Set the Endpoint URL to: For Actions: https://tr.outbrain.com/unifiedPixel?ob_click_id=[cmc_tid]&name=your_conversion_nameFor Engagements: https://tr.outbrain.com/unifiedPixel?ob_click_id=[cmc_tid]&name=your_conversion_nameFor Sales: https://tr.outbrain.com/unifiedPixel?ob_click_id=[cmc_tid]&name=your_conversion_name&orderValue=[cmc_amt]Be sure to replace your_conversion_name with the name of the Conversion you created in Outbrain earlier.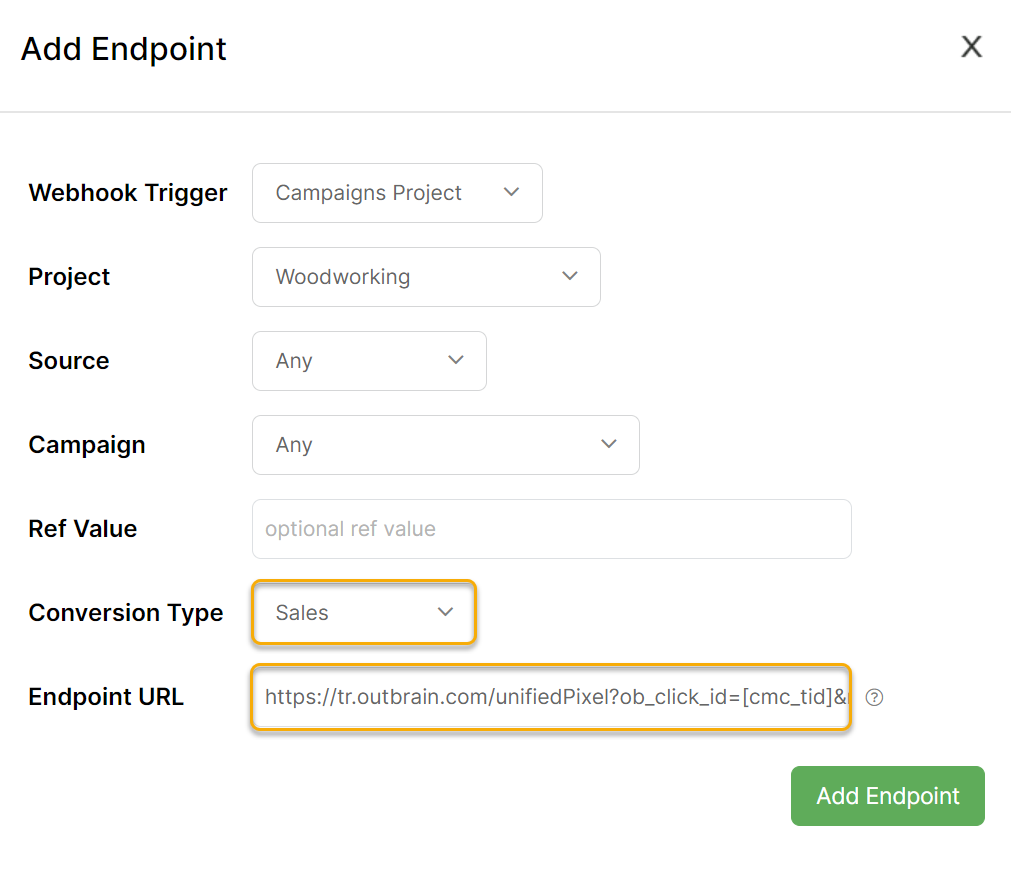
Click on Add Endpoint. |
Now, every time a sale is made, ClickMagick will report back to Outbrain that a sale has been made for the tracking link you selected.
RTX supports webhooks, so you can send conversion data back to them.
Here's how to set it up:
1. Create your RTX Endpoint URL
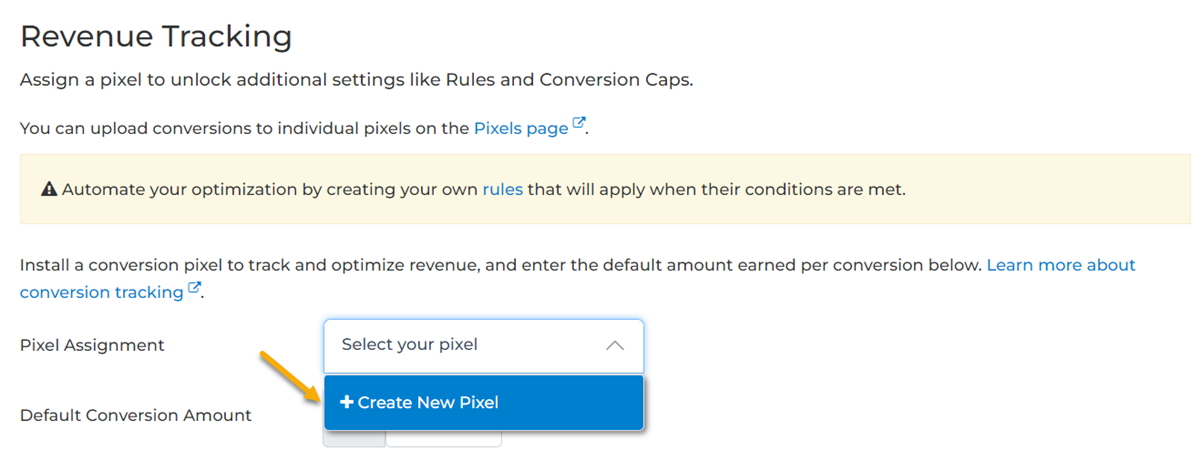
When creating or editing a campaign, scroll down until you see "Revenue Tracking". Where it says "Pixel Assignment", create a new pixel.
Select an Event Type and save the pixel.
Now you should see a new button that says "Install Your Pixel"

Click on the button and select "Server to Server" and copy your Endpoint URL to the clipboard:
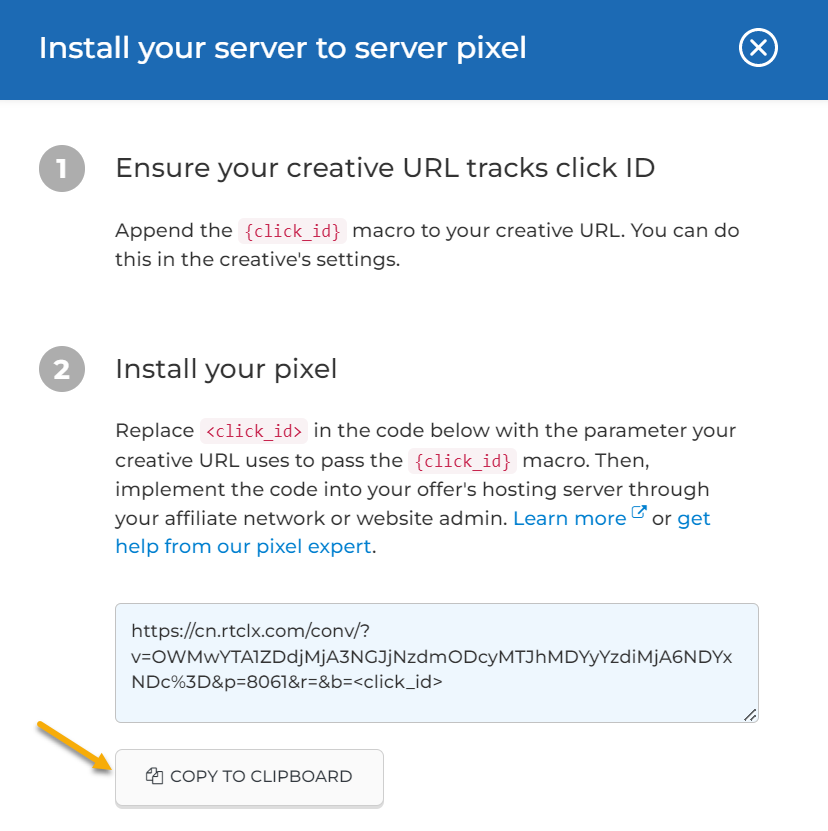
It should look something like this:
https://cn.rtclx.com/conv/?v=NDU1MzBjOTUxODI2OGUyNTRiOTNjM2ViZTE1M2QyZmY6NDM3ODM%3D&p=6899&r=&b=<click_id>2. Add the Endpoint URL as a Webhook
Edit the Endpoint URL, so that it passes the
[cmc_amt] as well as the {click_id} that you will use in the optional cmc_tid parameter.Will look something like this:
https://cn.rtclx.com/conv/?v=NDU1MzBjOTUxODI2OGUyNTRiOTNjM2ViZTE1M2QyZmY6NDM3ODM%3D&p=6899&r=[cmc_amt]&b=[cmc_tid]Note: In the above case, the
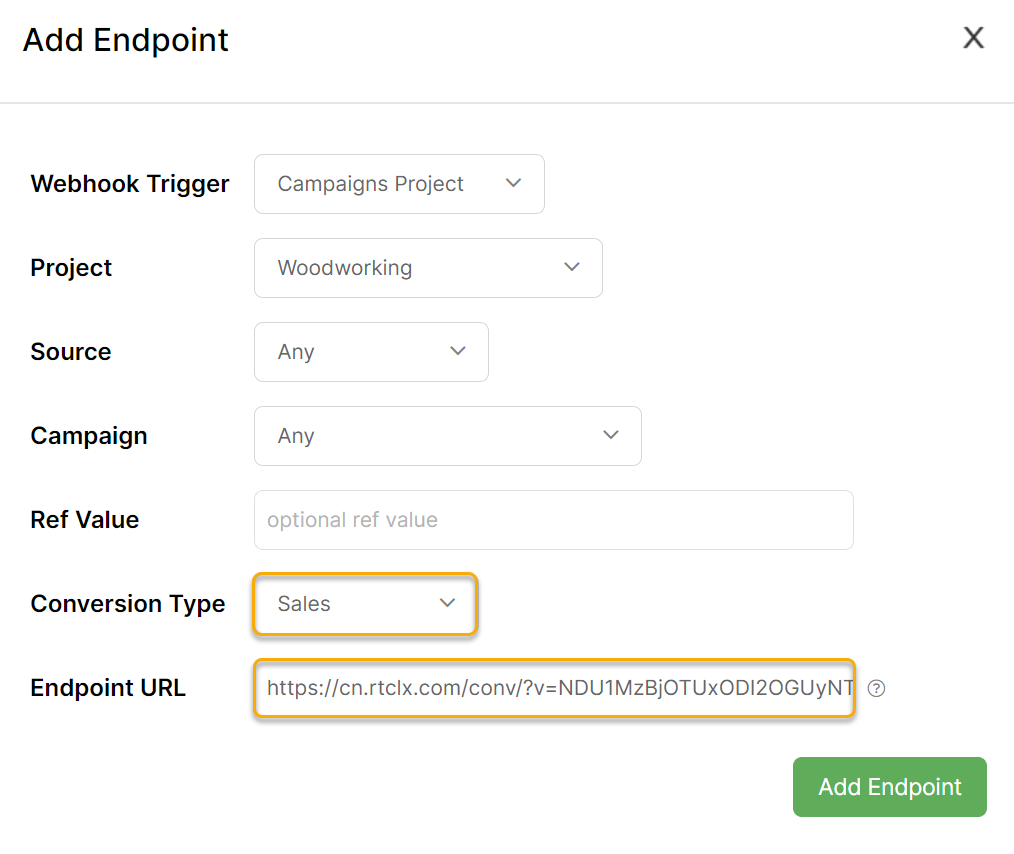
{click_id} from RTX is going to be passed in the cmc_tid parameter.Open the Webhooks tool by clicking on “Webhooks” in the Campaigns Tools menu.
Click “Add Endpoint" to create a new webhook.
Choose the project that you're working on, update the utm_source and utm_campaign values from the drop-down menu, then set the Conversion Type to Sales.
Add the URL above to the Endpoint URL box:
3. Create your UTM Powered Link to use in your RTX ads.
You want the
cmc_tid to be {click_id} It should be something like this:
https://example.com?utm_source=rtx&utm_medium=push&utm_campaign=example&cmc_tid={click_id}With this setup, whenever anybody clicks on an RTX ad and a sale is made, the sale will be recorded in Campaigns and then ClickMagick will report the sale back to RTX Platform.
Ad.Style supports a handful of different tracking methods, so you can send conversion data back to them.
In this article we walk you through sending conversion data to them using a webhook.
Here's how to set it up:
1 - Create Your Ad.Style Endpoint URL
To do this, you'll click on the "Campaign Settings" next to your Campaign:
At the end of the page you'll see Conversion Pixel, click on the Create conversion pixel text:
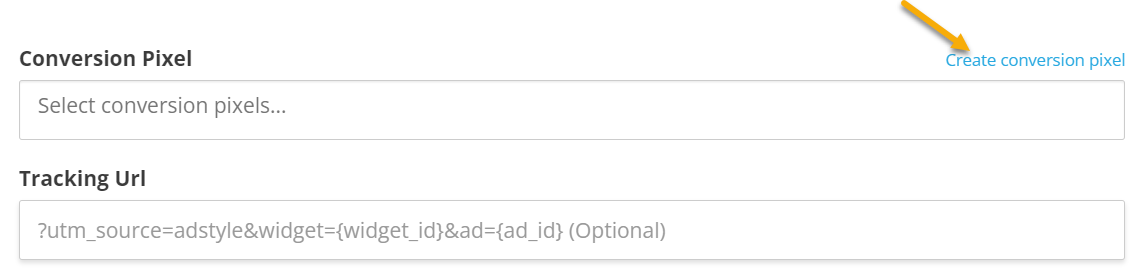
Just give your pixel a name, then click on the "Create Conversion Pixel" button.
Now click on Server To Server to get your Endpoint URL:
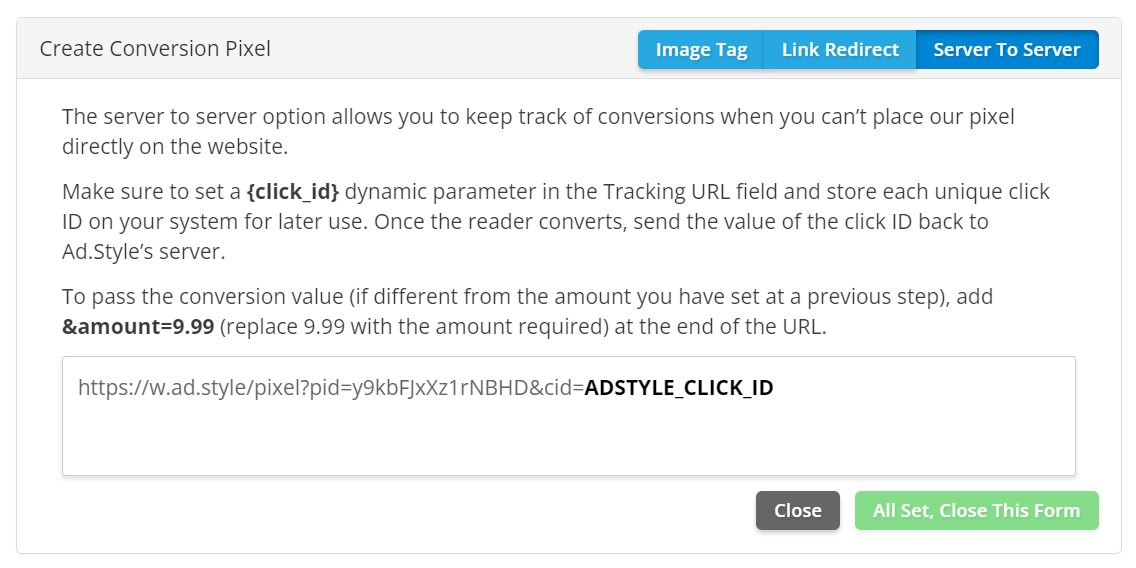
It should look something like this:
https://w.ad.style/pixel?pid=YaFcpEhFjMM&cid=ADSTYLE_CLICK_ID2 - Add the Endpoint URL as a Webhook
Edit the Endpoint URL, so that it passes the
[cmc_amt] as well as the {click_id} that you will use in the cmc_tid parameter.It will look something like this:
For Actions and Engagements:
https://w.ad.style/pixel?pid=YaFcpEhFjMM&cid=[cmc_tid]For Sales:
https://w.ad.style/pixel?pid=YaFcpEhFjMM&cid=[cmc_tid]&amount=[cmc_amt]Note: In the above case, the
click_id from Ad.Style is going to be passed in the cmc_tid parameter.Open the Webhooks tool by clicking on “Webhooks” in the Campaigns Tools menu.
Click “Add Endpoint" to create a new webhook.
Choose the project that you're working on, update the utm_source and utm_campaign values from the drop-down menu, then set the Conversion Type to Sales.
Set the Endpoint URL to on of the URLs above:
3 - Create your UTM Powered Link to use in your Ad.Style ads.
You'll want to add the
{click_id} to the cmc_tid parameter in the URL Builder: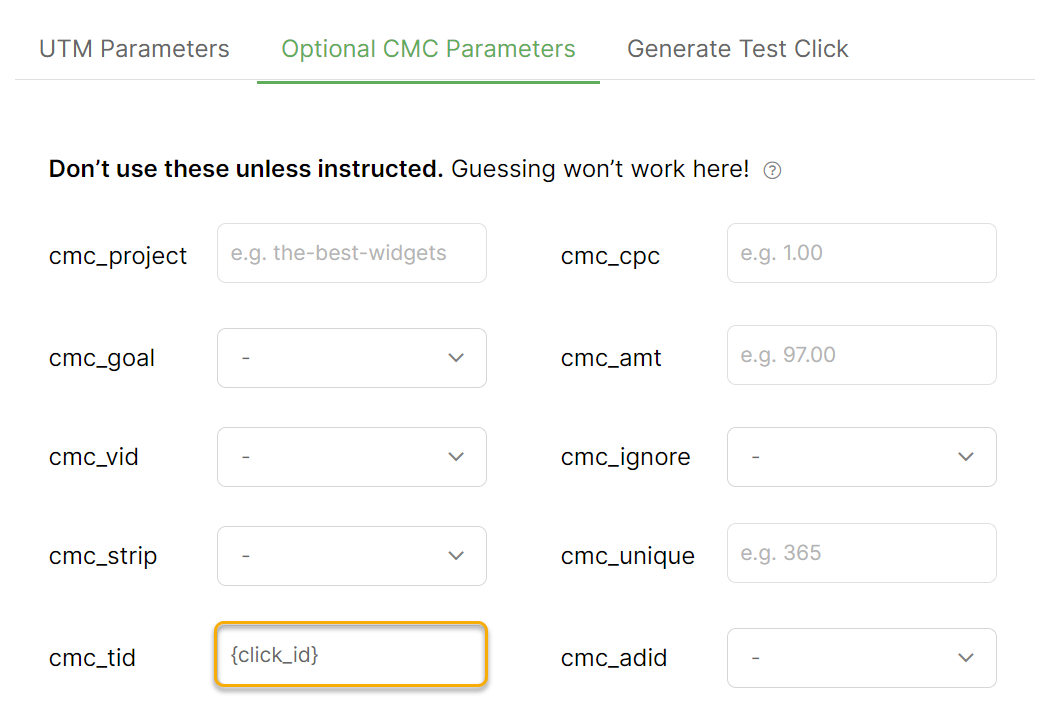
It should look something like this:
https://example.com?utm_source=adstyle&utm_medium=name&utm_campaign=example&cmc_tid={click_id}With this setup, whenever anybody clicks on your Ad.Style ads and a conversion is tracked in Campaigns, we'll automatically send the conversion back to the Ad.Style platform.
Mondiad supports webhooks, so you have the ability to send conversion data back to Mondiad.
Here’s how to set it up:
| 1. | Set up your landing page that you’ll use with Mondiad. |
| 2. |
Add UTM parameters to your landing page URL using the URL Builder. 
Your URL should look something like this: https://example.com?utm_source=mondiad&utm_medium=native&utm_campaign=example&cmc_tid=[clickid]Add your landing page URL with added UTM parameters and [clickid] token from the URL Builder to the target URL section of your Mondiad campaign: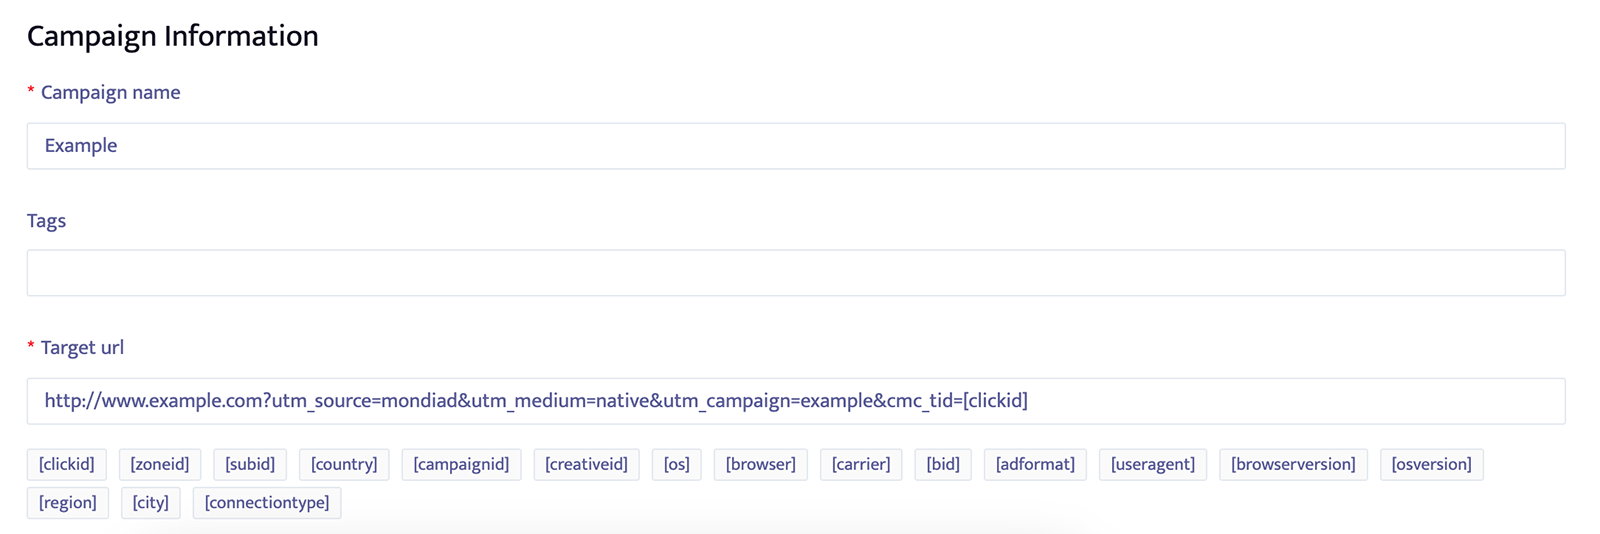
|
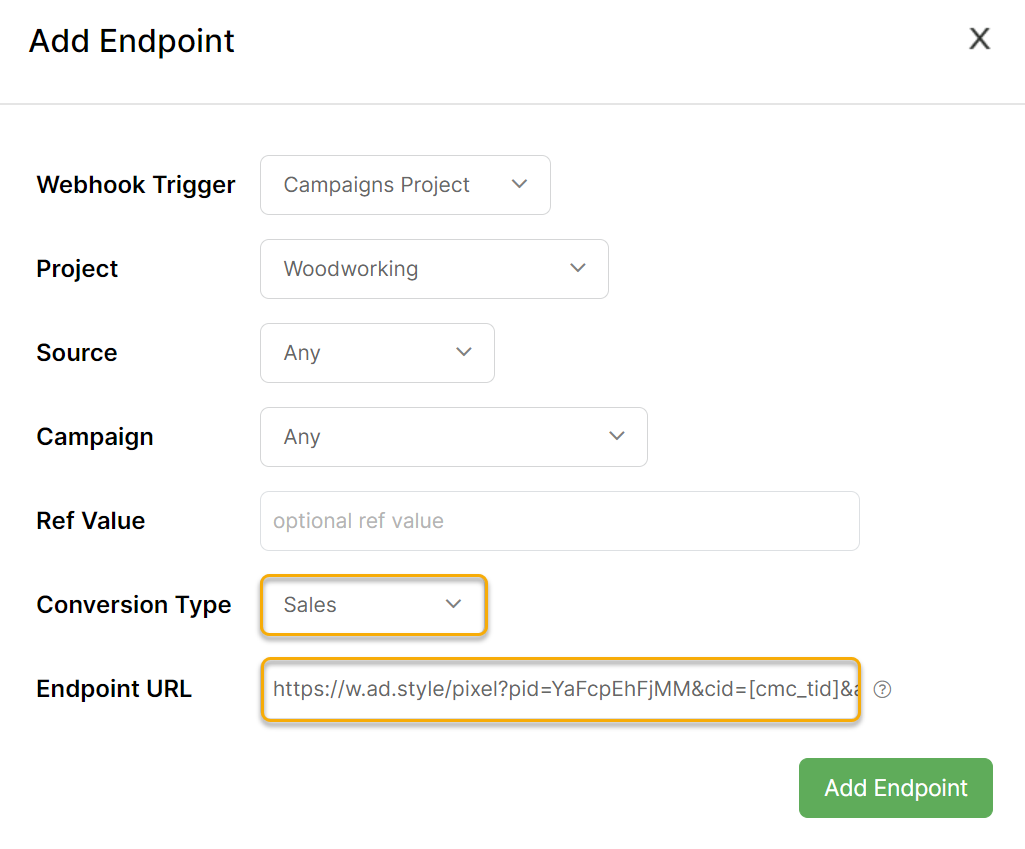
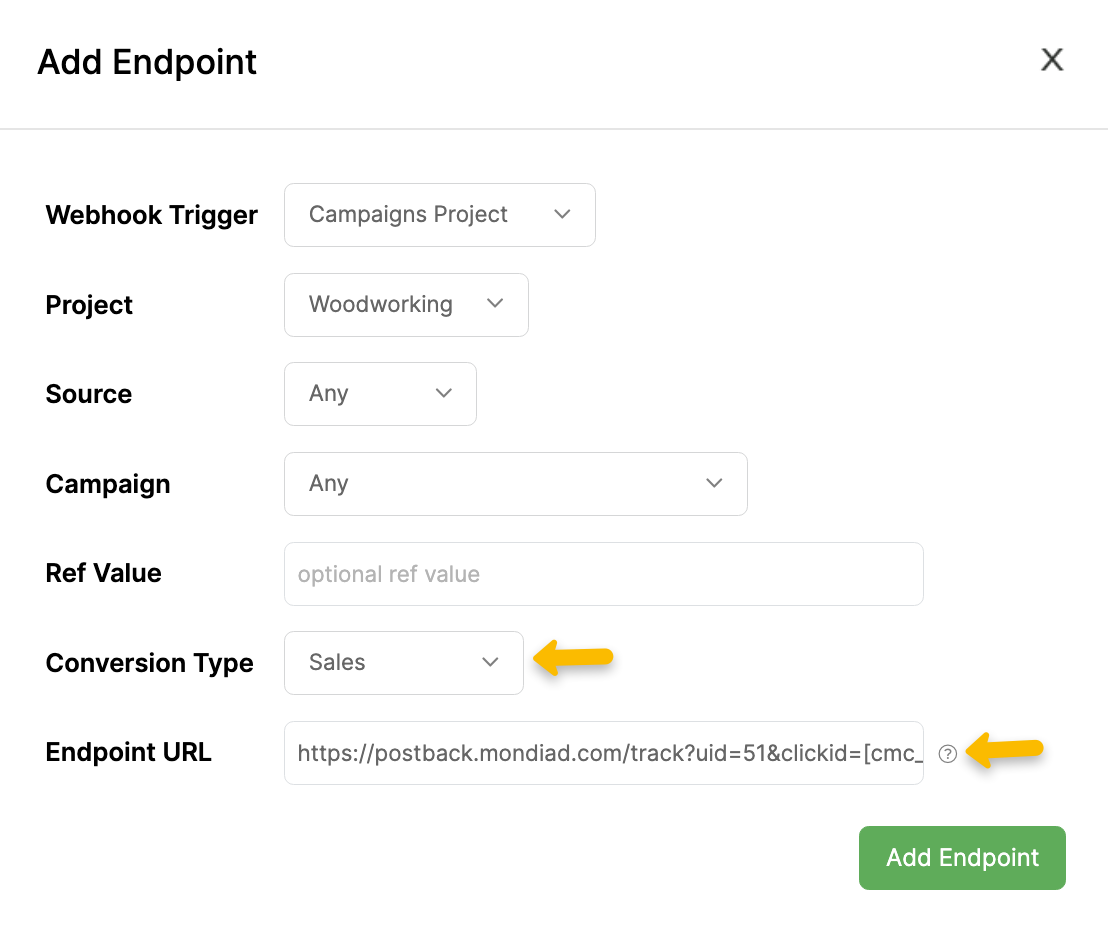
| 3. | In ClickMagick, open the Webhooks tool by clicking on “Webhooks” in the Campaigns Tools menu. Click “Add Endpoint" to create a new webhook. Choose the project that you're working on, update the utm_source and utm_campaign values from the drop-down menu, then set the Conversion Type to Sales. Set the Endpoint URL to: https://postback.mondiad.com/track?uid=<your-user-id>&clickid=[cmc_tid]&payout=[cmc_amt]You’ll need to replace <your-user-id> with your actual Mondiad user ID, which you can find here: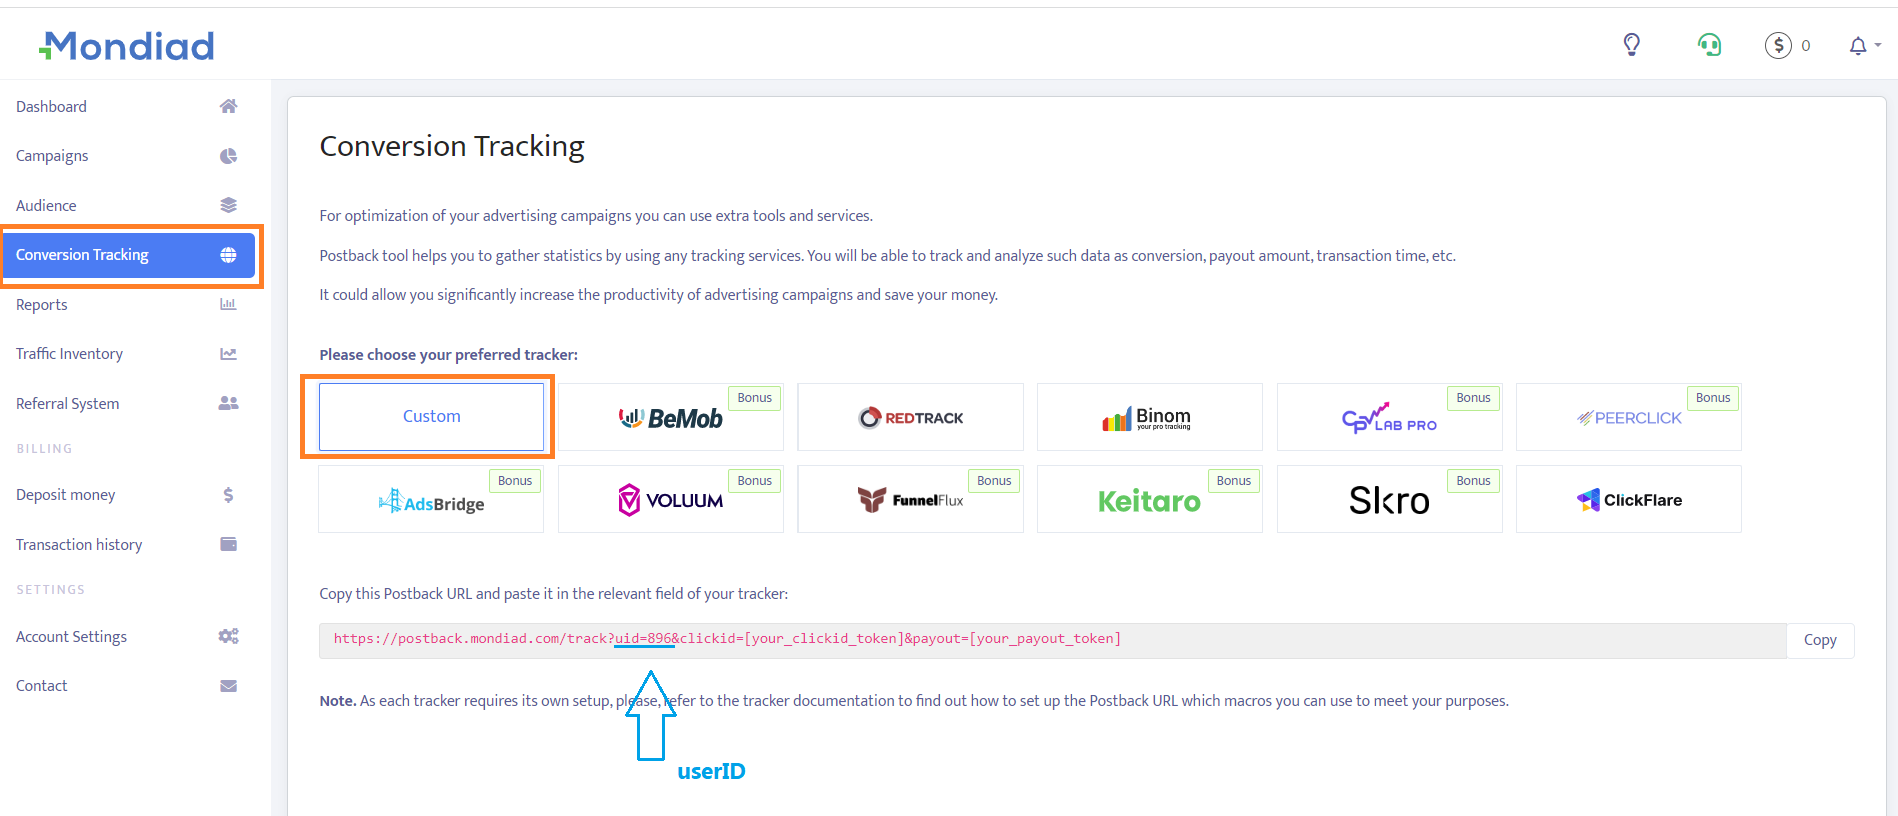
|
| 5. | Click on Add Endpoint. |
Article 859 Last updated: 02/10/2024 11:22:23 AM
https://www.clickmagick.com/kb/?article=859