|
What is Audience Optimization and how do I use it?
Audience Optimization sends your conversion data from ClickMagick Campaigns back to the ad networks you advertise on. Without it, they are trying to optimize with bad data, so Audience Optimization helps their ad optimization algorithms work more efficiently – resulting in more great customers for you at the lowest cost possible.
The first thing you need to know is that you absolutely cannot rely on the conversion stats provided by your ad platforms.
That doesn’t work because they don’t have all the data points necessary to generate accurate and actionable marketing insights. And things like iOS 14.5+ privacy changes have made things even worse.
If you’re interested, you can learn more in the article below:
Why can’t I rely on the stats in my ad network account?
Based on the data, the bottom line is that the major networks like Facebook and Google miss-attribute or completely miss anywhere from 20-50% or more of your conversions.
And that means your ad networks' conversion and revenue stats are worthless.
The other major problem is that the ad network pixels on your pages feed all this bad data back to the ad networks 24 hours a day, 7 days a week.
So now they’re using this bad data to find you new customers …
This means their algorithms are going to be a lot less efficient than they should be, and the result is fewer new customers for you and at a higher cost for what you do get.
In short, ClickMagick Audience Optimization fixes this problem.
It allows you to feed your actual conversion data back to the ad networks, which allows their algorithms to find you even more and better customers at the absolute lowest cost possible …
And this will dramatically increase your profit margins and make it much easier to scale.
Before you get started, you'll want to make sure you've completed your Campaigns tracking setup.
There’s just a few steps to set up Audience Optimization for Google, and if you’re familiar with the Google Ads interface it shouldn’t take long at all …
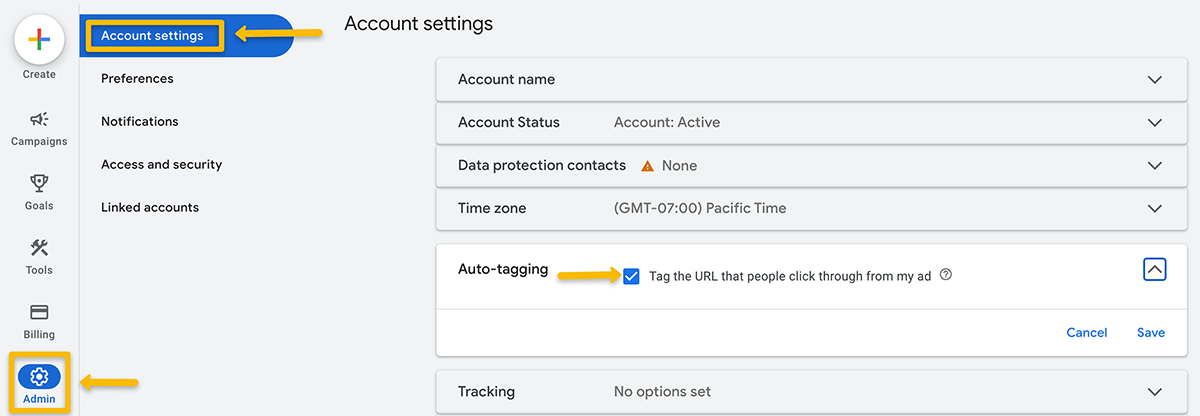
Step 1 - Ensure that you have auto-tagging enabled
Before you get started, make sure that you have auto-tagging turned on in your Google Ads account by going to Admin > Account Settings and checking the “Auto-tagging” box:
Step 2 - Create a New Google Ads Conversion Action (or as many as you want!)
While you can use any of your existing Conversion Actions, they are almost certainly “polluted” with bad data. We strongly recommend you create new Conversion Actions for use with ClickMagick.
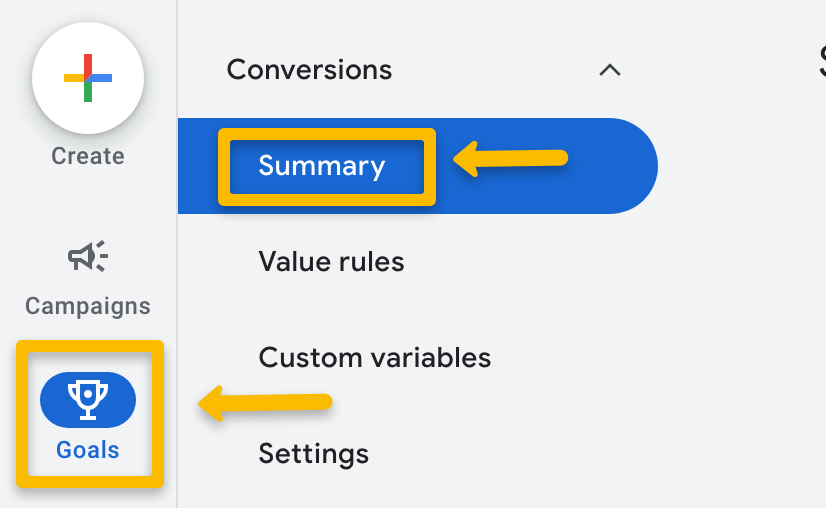
To do so, head over to your Google Ads account, click on “Goals”, and select “Summary”:
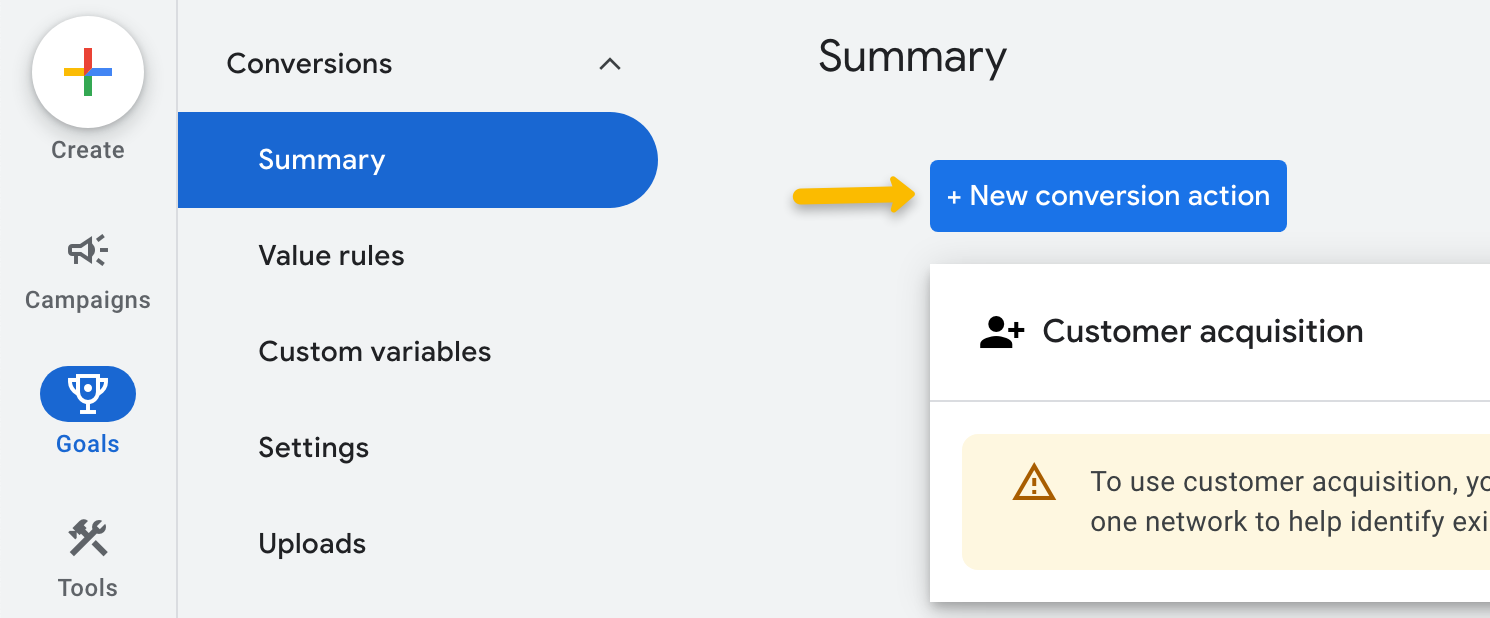
Click the "+ New conversion action” button:
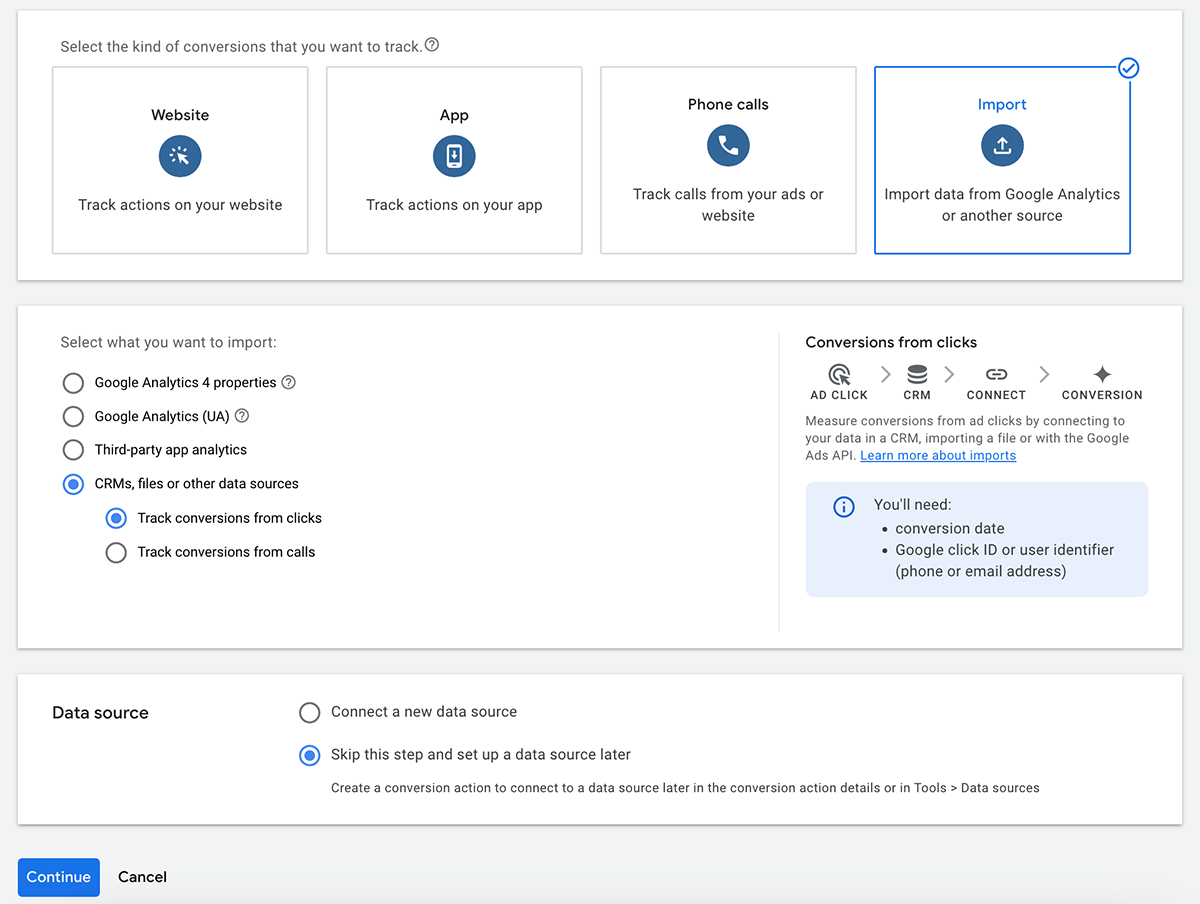
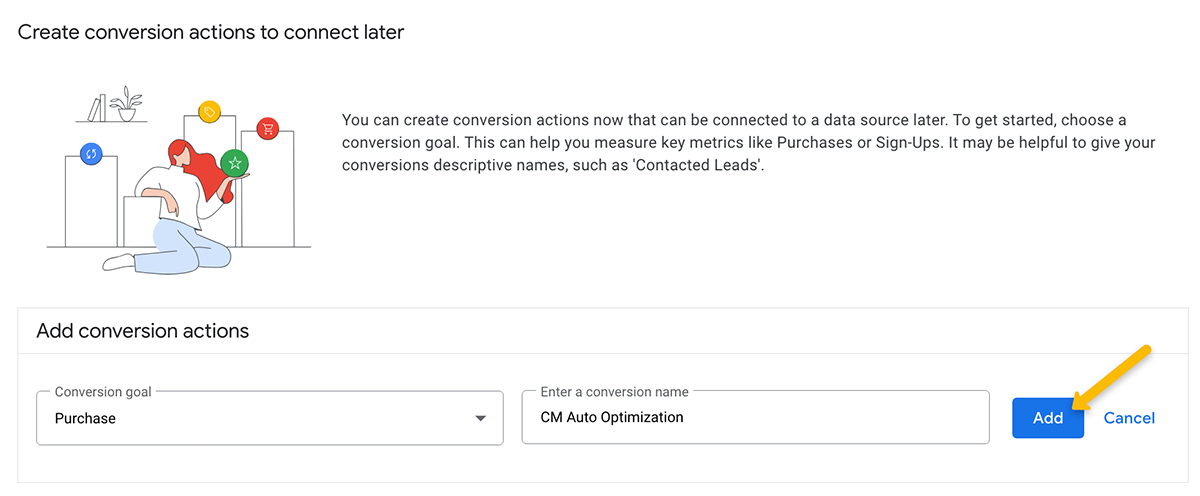
Select “Import” from the conversion type, click on “CRMs, files or other data sources”, select “Track conversions from clicks”, then click on “Skip this step and set up a data source later”. After that, hit “Continue”:
Fill in the details for your new conversion action …
If you want to change any settings for your new conversion action, click on “Settings”, then “Conversion action settings”. In most cases, the default settings are fine, however if you’re a performance marketer and don’t want conversions spread across multiple ads, choose “Last Click” as your “Attribution” setting.
Note: Note: Unless you have a specific reason for doing so, always set the “Count” setting to “Every” instead of “One”. iOS (wbraid) conversions cannot be uploaded to Conversion Actions set to “One”.
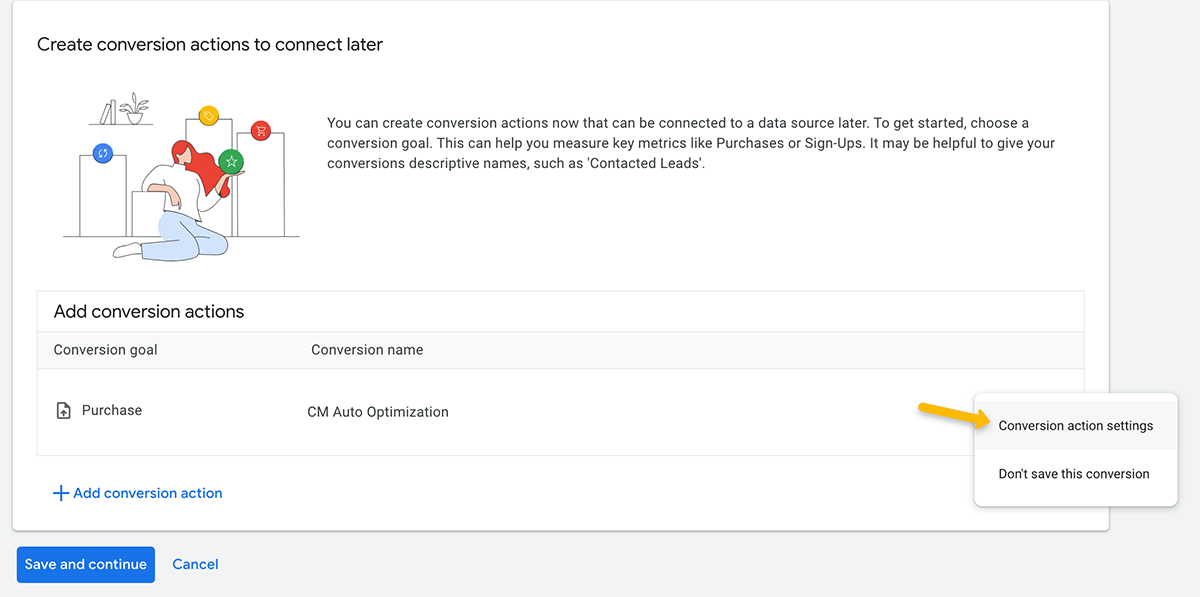
After that, just click on “Save and continue” and you're done creating your new conversion action!
Note: After you create this new Google Conversion Action, it can take up to 4 hours to become active and available. It may show as “Inactive” in Google, but it will become active when you send your first conversion to it.
Step 3 - Integrate your Google Ads account with ClickMagick
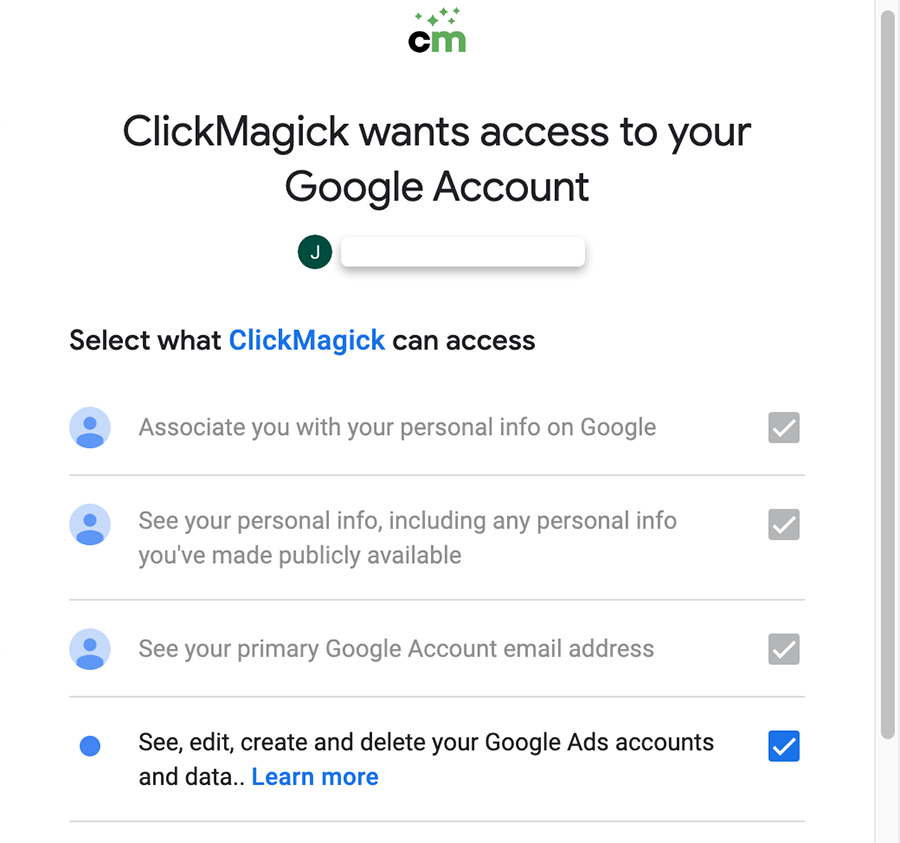
You can integrate your Google Ads account from the Integrations page, available under the Account menu at the top of any page. Once there, click on “Sign In With Google” and sign in to the Google account that contains your ad accounts. Make sure to check all four boxes as shown below.
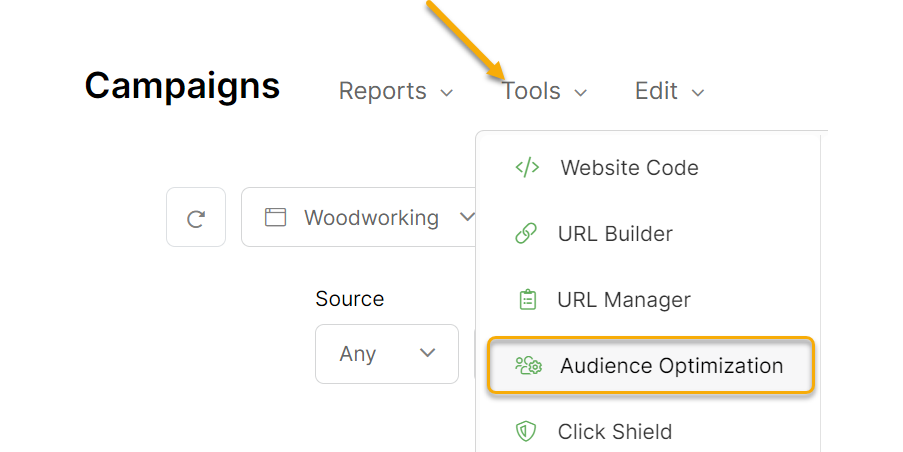
Then head to Audience Optimization from the Tools Menu on the Campaigns Page:
Select the Google Ads tab, switch Enabled to “Yes,” and the Default Conversion Action window will pop up (if this is the first time configuring the automatic configuration):
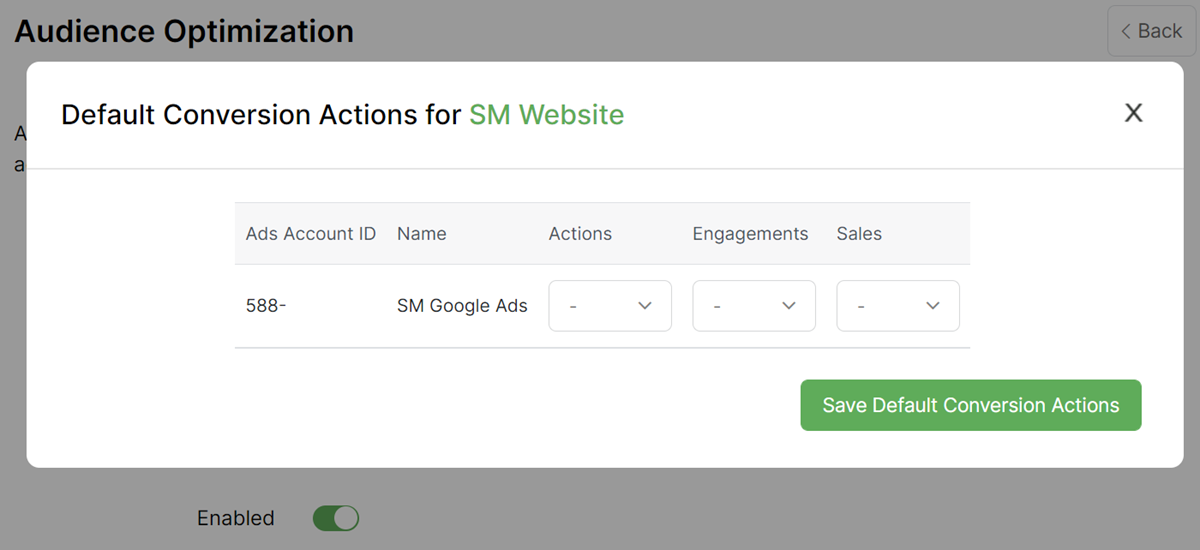
Note: You must configure at least one Default Conversion Action to keep Audience Optimization active. See the ERRORS tab in this article for more information.
Most users generally want to optimize for Sales, so if that’s the case, select the Conversion Action you want in the Sales column, hit Save, and that’s all there is to it.
But know that you can also separately create and optimize for other things like Opt-Ins. If you do, select the appropriate Conversion Actions for ClickMagick Actions and/or Engagements as well.
The Default Conversion Actions allow you to specify a single Conversion Action for each of Actions, Engagements and Sales within a single Campaigns Project.
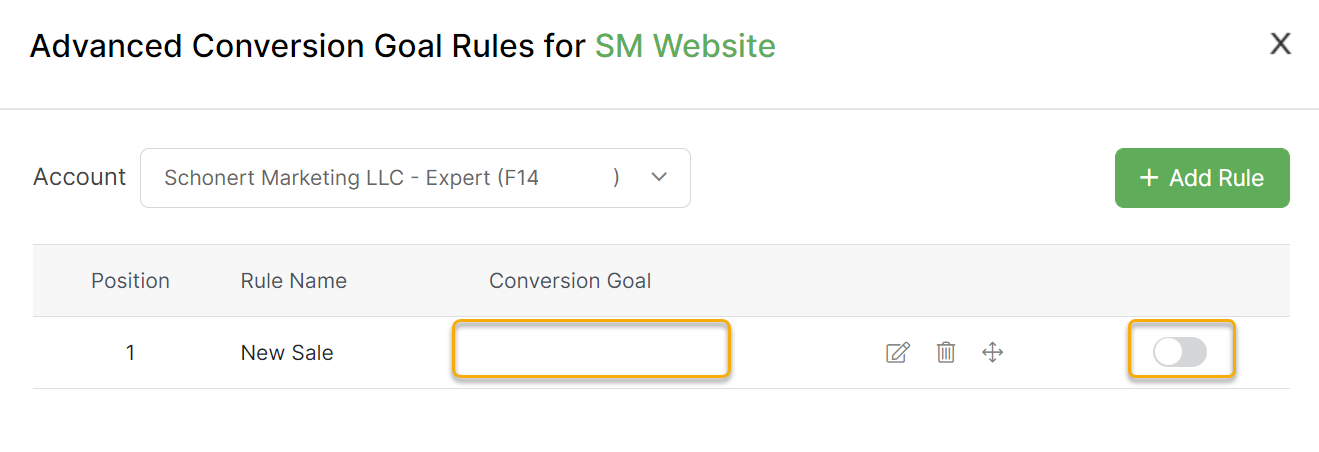
If you need to do something more advanced you’ll want to set up Advanced Rules, which you can learn about below:
How do I set up Advanced Rules for Audience Optimization?
Once you’re done setting things up, ClickMagick will automatically send your conversion data to your Google Ads Account in real-time as each conversion occurs.
The last thing you’ll want to do is select this new conversion action as the optimization goal for your campaign. If you’re not sure how to do that, follow the article below:
How do I optimize my ads using the new ClickMagick pixel I’ve set up?
Note: It takes Google up to 6 hours to process clicks, and they will not accept conversion data until they have first processed the corresponding click.
When a conversion is tracked in ClickMagick, we immediately attempt to send it to Google. If it’s rejected because they haven’t processed the original click, it goes in to a queue and we will re-try every hour until they accept it.
Note that even once the conversion is accepted by Google, it can still be several more hours before you’ll see it in Google. Nothing they do is in real-time.
Step 4 – Capture and Send Visitor Info with your Google Conversions
iOS users who opt out of tracking can no longer be individually tracked by Google Ads – and this means their ad optimization algorithms don’t work as well as they used to.
To solve this problem, ClickMagick can capture first-party data collected on your site and pass it to Google Ads with your conversions to generate the absolute highest event match scores possible.
If you haven’t already, follow the steps in this article to allow ClickMagick to capture your visitors’ info:
How do I capture visitor info from forms on my site in ClickMagick?
Once you’ve done that, just enable Enhanced Conversions in Google Ads by following these steps:
In your Google Ads dashboard, click on “Goals” and then “Settings”:
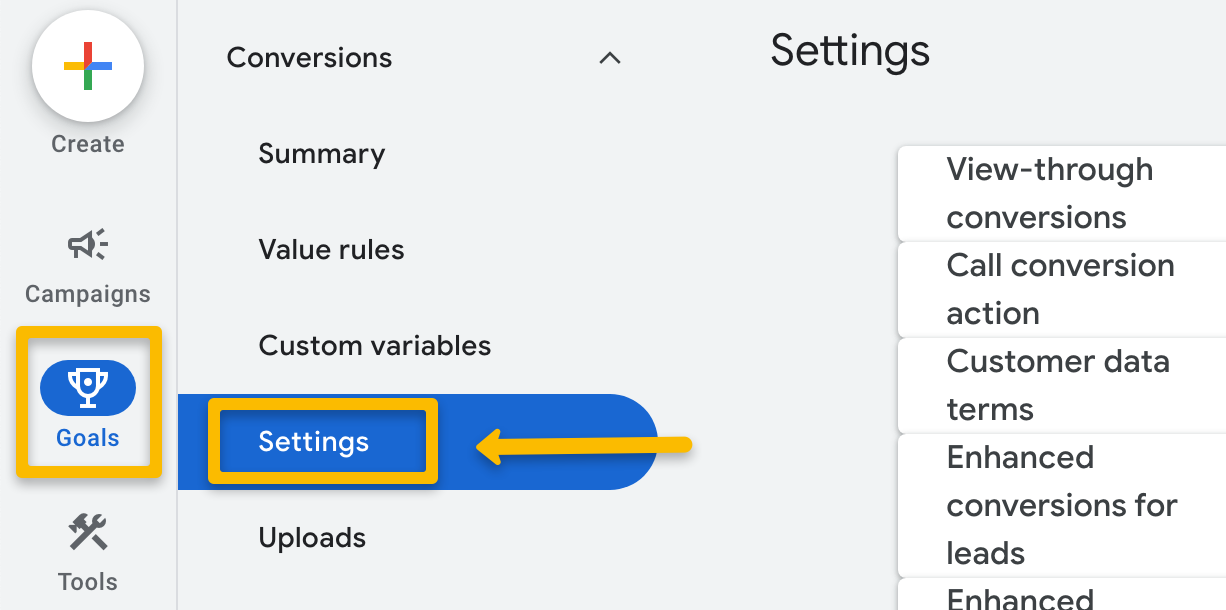
Expand the section that says “Enhanced Conversions for Leads”
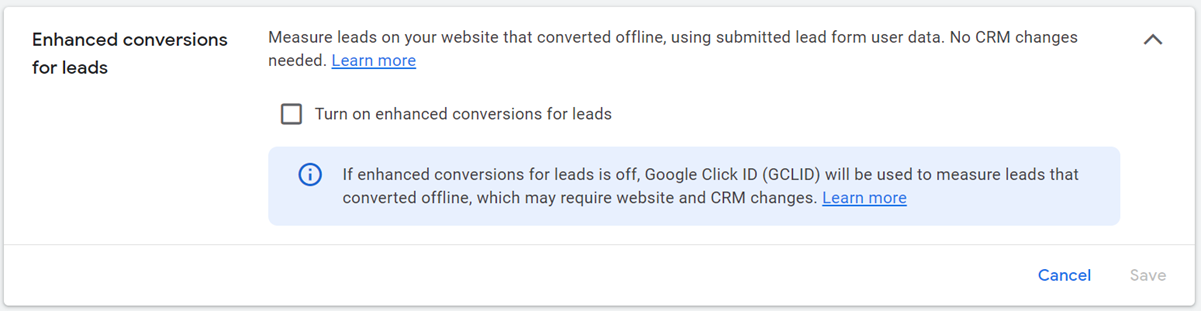
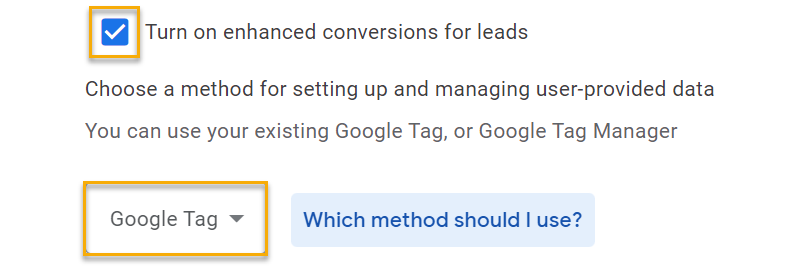
Check the box “Turn on enhanced conversions for leads”.
Note: If you haven’t previously accepted the customer data terms, you will be automatically prompted to do so. You have to accept the terms to enable this feature.
Once the box is checked, you will see a dropdown to choose the method for setting up and managing user-provided data. If you aren’t sure which option to choose, click the link to the right of the dropdown, and Google will walk you through how to determine the best one.
Click save to confirm your changes. If done correctly, you should see the settings look like this:

Once you've set this all up, ClickMagick will automatically capture visitor info from your website or online store, and send it along with your conversion data back to your Google Ads account.
At this point you will literally get the best ad optimization that Google Ads is capable of, and you can stop worrying about it. There isn’t another app or tool that can get you better Google Ads optimization, at any price.
Step 5 – Implement Google’s Consent Mode v2 framework (if you run ads in the EEA or UK)
Consent Mode v2 is Google’s updated framework designed to integrate website visitor consent preferences with Google’s advertising and analytics tools. This is now mandatory as of March 2024 if you run Google ads in the EEA or UK.
Learn more in the article below …
What should I know about Google's Consent Mode v2?
Before you get started, you’ll want to make sure you’ve completed your Campaigns tracking setup.
You’ll also want to familiarize yourself with the Facebook-specific information in the article below:
What should I know about iOS and Facebook Ads?
There’s just a few steps to set up Audience Optimization for Facebook, and if you’re familiar with the Facebook Ads interface it shouldn’t take long at all ...
Step 1 – Create a new Facebook Pixel
Your existing Facebook pixels are "corrupted” with bad data and should NOT be used for optimization.
Instead, you’ll want to create a new pixel that ClickMagick can post your actual conversion data to and “start fresh.”
This new pixel will be the only source of your actual conversion data inside of Facebook Ads, and you’ll want to start using this new “ClickMagick pixel” for optimization going forward.
Note: To be perfectly clear, none of this affects your existing Facebook pixels. You’re only “starting over” in the sense that you’ll be training a new, more accurate pixel from scratch. If necessary you can still use your existing pixels in any way that makes sense to you.
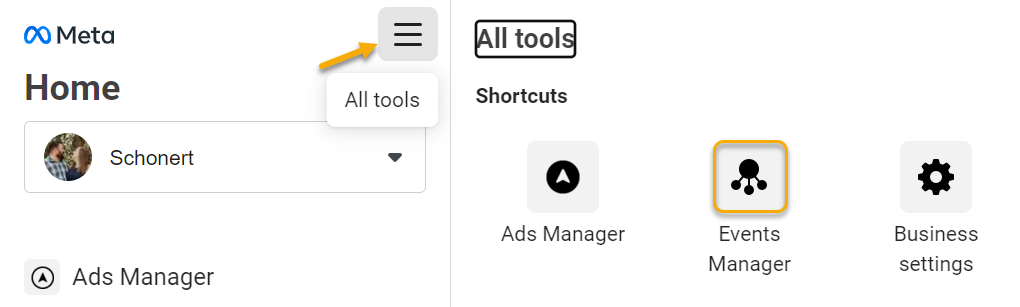
Go to your Facebook Events Manager ...
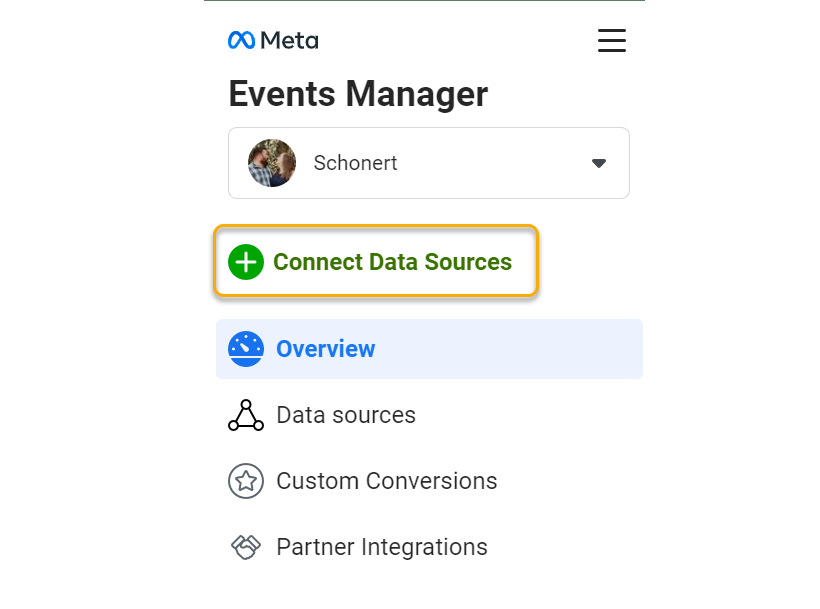
Click “Connect Data Sources” ...
Select “web” and then “Continue”, then give your new pixel any name you want and click “Continue.”
Once you name your pixel and click “Continue” your pixel will be created. Facebook will then present you with instructions on how to use your pixel but this is not important so just close the window.
Caution: Do not under any circumstances add this new pixel to your website. If you do it will become corrupted with bad data and you’ll have to start over!
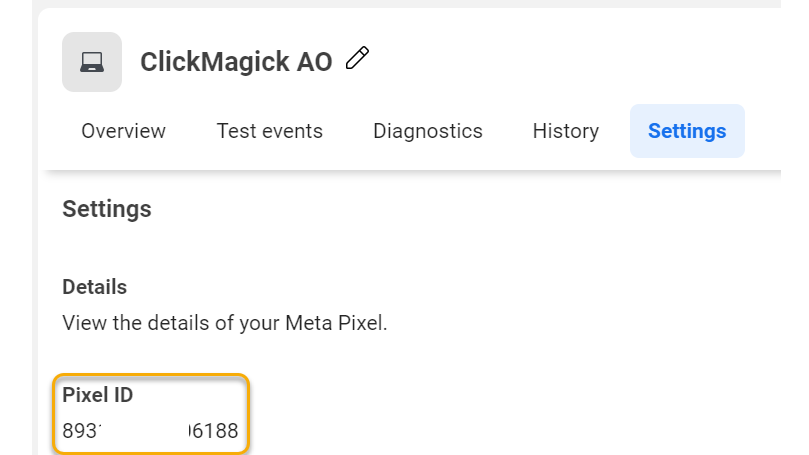
Step 2 – Copy your new Pixel’s ID
You should see your new pixel listed in the “Data Sources” column on the left. You will need the Pixel ID and the easiest way to get it is to click on the pixel you just created, then click on Settings and copy the Pixel ID from there
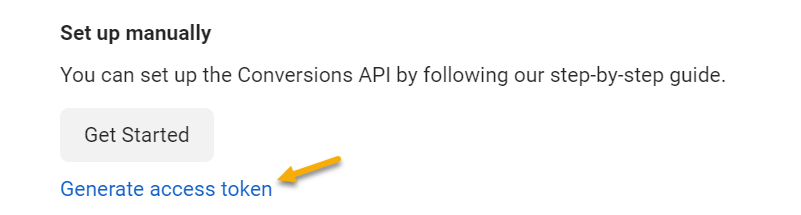
Step 3 – Create an Access Token
In order for ClickMagick to be able to post your conversions to the Facebook Conversion API, you’ll need to create and provide us with a Facebook API Access Token.
Select your new pixel, then select Settings, find the Conversions API section and click on “Generate access token” under “Set up manually”. Copy this Access Token for use in the next step.
Step 4 – Add your Pixel to ClickMagick
Now you need to tell ClickMagick about your new pixel. To do this, simply navigate to the Campaigns project you want to optimize, select Audience Optimization from the Tools menu, then select the Facebook option.
Select the type of conversion you want to send to Facebook – Action, Engagement or Sale – and then flip the switch to enable Audience Optimization for Facebook Ads …
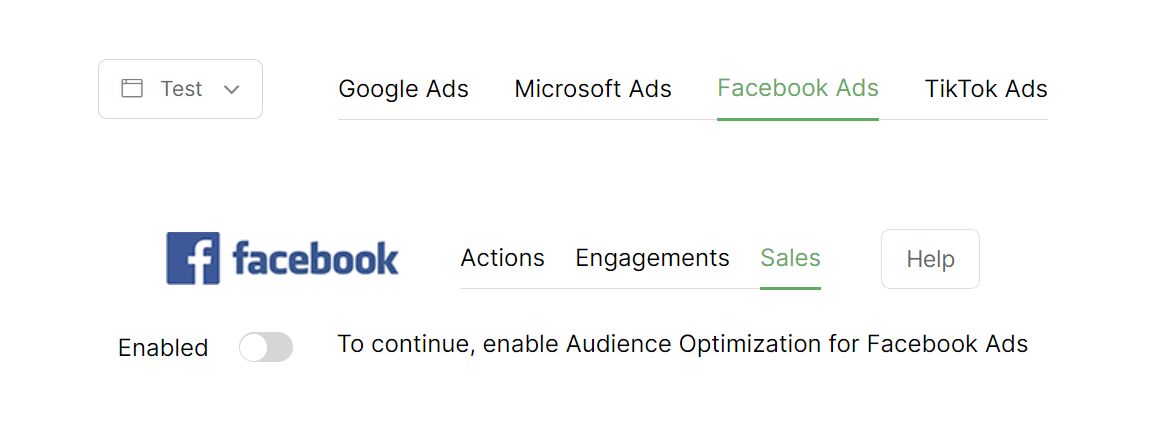
If this is your first time adding a Facebook Pixel you’ll see this screen. Enter your pixel details to continue …
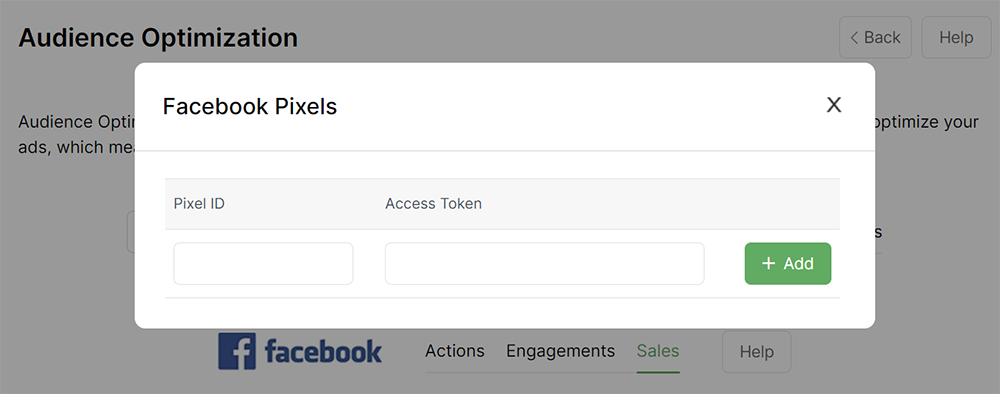
On the other hand if you’re already using Audience Optimization with Facebook Ads and just need to add a new pixel, click “+ Add/Manage Pixels” to go ahead and add any new pixels you want.
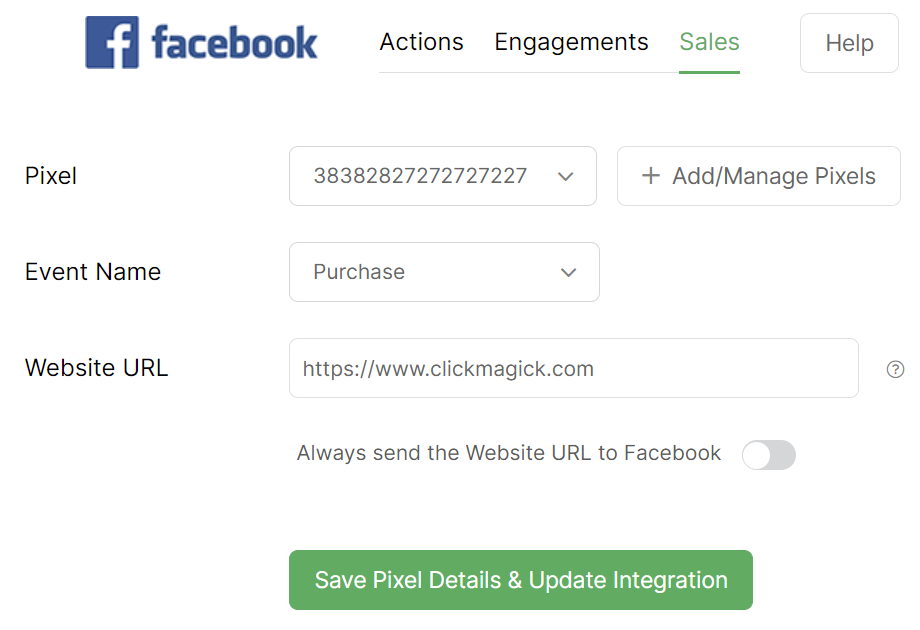
Finally, just select the Facebook Event Name you want to use, enter the URL of your homepage, and submit the form to enable the basic integration.
You actually have almost unlimited flexibility in terms of which conversions you send back to specific Facebook Pixels, so if you need to do something more advanced you'll want to learn more about Advanced Rules at the link below:
How do I set up Advanced Rules for Audience Optimization?
Note: We’ll always pass the URL where a conversion occurred to Facebook’s API when one is available. When no URL is available — for example if you’re tracking affiliate sales via Postbacks — we’ll simply pass the Website URL you entered when you saved your pixel settings. If you want ClickMagick to always send the Website URL you entered, simply enable that option.
For your Website URL to work correctly with Facebook, the website domain must be a domain that you’ve properly configured in your Facebook Events Manager. If it’s not, Facebook will ignore any conversions we send with this “backup” URL.
For your Website URL to work correctly with Facebook, the website domain must be a domain that you’ve properly configured in your Facebook Events Manager. If it’s not, Facebook will ignore any conversions we send with this “backup” URL.
Tip: While you can technically send Action, Engagement and Sales conversions to your pixel, Facebook only allows you to select a single event to optimize for.
So for example if you know you’re only ever going to optimize for Sales, there’s really no benefit in sending Action or Engagement conversions to your pixel.
You can however add as many Facebook Pixels as you want to ClickMagick, and use Advanced rules to determine which conversions to send to which pixels.
Step 5 – Verify Your Pixel Is Receiving Data
Once you’ve set up your Facebook Pixel in ClickMagick, we’ll immediately start sending the conversions you want to optimize for to your new pixel via Facebook’s Conversion API in real-time.
Once the first new conversion is sent to your pixel you’ll see a simple status message on the same screen where you set up your pixels letting you know if everything is working properly.
You can also verify that Facebook is receiving the data correctly by selecting the pixel in your Facebook Ads account and viewing the pixel activity on the Overview tab.
Please note that while we send your conversions in real-time it usually takes Facebook anywhere from 15 minutes to 2 hours or longer to update on their end.
Step 6 – “Season” Your New Facebook Pixel
Making the switch to a new pixel that has only accurate data is a very smart move, but it does require “starting over” for optimization purposes. So for the best performance you’ll want to “season” this new pixel a bit before using it.
To be clear – we recommend that you do NOT start using this new pixel for optimization right away. If you do, you’ll almost certainly see a temporary drop in ad performance.
Instead, set everything up, start sending some traffic, and let ClickMagick start to track your clicks and conversions, and begin sending your conversion data to your new Facebook pixel.
This will “season” your pixel and allow Facebook’s AI to learn what your ideal customer looks like.
We can’t tell you exactly how long to season your new pixel as it really depends on the number of conversions you get per day, your audience and many other factors …
The short answer is “the longer the better,” but we suggest waiting at least a week or two and then you can go ahead and test your new pixel’s performance by using it to optimize a single campaign or a single ad set.
If things don’t go great that generally means you need to send Facebook more data to work with, so stop using the pixel for awhile, let us send more data, and then try it again in a week or so.
Once you’re happy with the performance of your new pixel you can go ahead and apply it to your other campaigns.
Step 7 – Use Your New Pixel for Facebook Ad Optimization
When you’re ready, you’ll use your new Pixel to optimize your Facebook ads like never before.
If you want to optimize for an Action like an opt-in, these will show up in your pixel as the standard Facebook “Contact” event. So when optimizing your ads you would simply select your new pixel and then select the “Contact” event. For Engagements you’d choose the “Lead” event, and for Sales it’s the “Purchase” event.
And that’s really all there is to it. As your new pixel gathers more and more accurate data, the performance of your ads should continue to increase and far surpass previous results based on Facebook’s inaccurate pixel data.
If you're not sure how to start using the new pixel to optimize your ads, follow the article below:
How do I optimize my ads using the new ClickMagick pixel I’ve set up?
Tip: There have been massive changes recently with Facebook Ads due to the new privacy policies enforced by iOS 14.
And while these technically have nothing to do with ClickMagick, they could very easily trip you up as you try to use your new pixel for ads optimization.
To read about a few specific things you’ll need to do in your Facebook Ads account in response to their recent changes, please see the article below:
What are the two new things I have to do in Facebook Ads?
Step 8 – Capture and Send Visitor Info with your Facebook Conversions
iOS users who opt out of tracking can no longer be individually tracked by Facebook Ads – and this means their ad optimization algorithms don’t work as well as they used to.
To solve this problem, ClickMagick can capture first-party data collected on your site and pass it to Facebook Ads with your conversions to generate the absolute highest event match scores possible.
If you haven’t already, follow the steps in this article to allow ClickMagick to capture your visitors’ info:
How do I capture visitor info from forms on my site in ClickMagick?
Once you’ve done this, ClickMagick will capture and encrypt this user data and send it back to Facebook when a conversion is generated, allowing for very high Event Match Quality scores even without a Facebook Click ID.
To be clear, no other platform – at any price – can get you higher Facebook match scores than this.
ClickMagick will send every single piece of data that Facebook can use – up to 18 different data points per user – to match your conversions back to individual Facebook users …
And you will get the best matching and ad optimization that Facebook is capable of.
To learn more about how ClickMagick helps you get the highest Facebook Event Match Quality scores possible, please see the article below:
What is the Facebook Event Match Quality Score?
And if you have further questions about using your Facebook pixel, please see the article below:
What are some frequently asked questions about Facebook pixels?
Before you get started, you'll want to make sure you've completed your Campaigns tracking setup.
There’s just a few steps to set up Audience Optimization for Microsoft, and if you’re familiar with the Microsoft Ads interface it shouldn’t take long at all ...
Step 1 - Ensure Auto-Tagging is Turned On
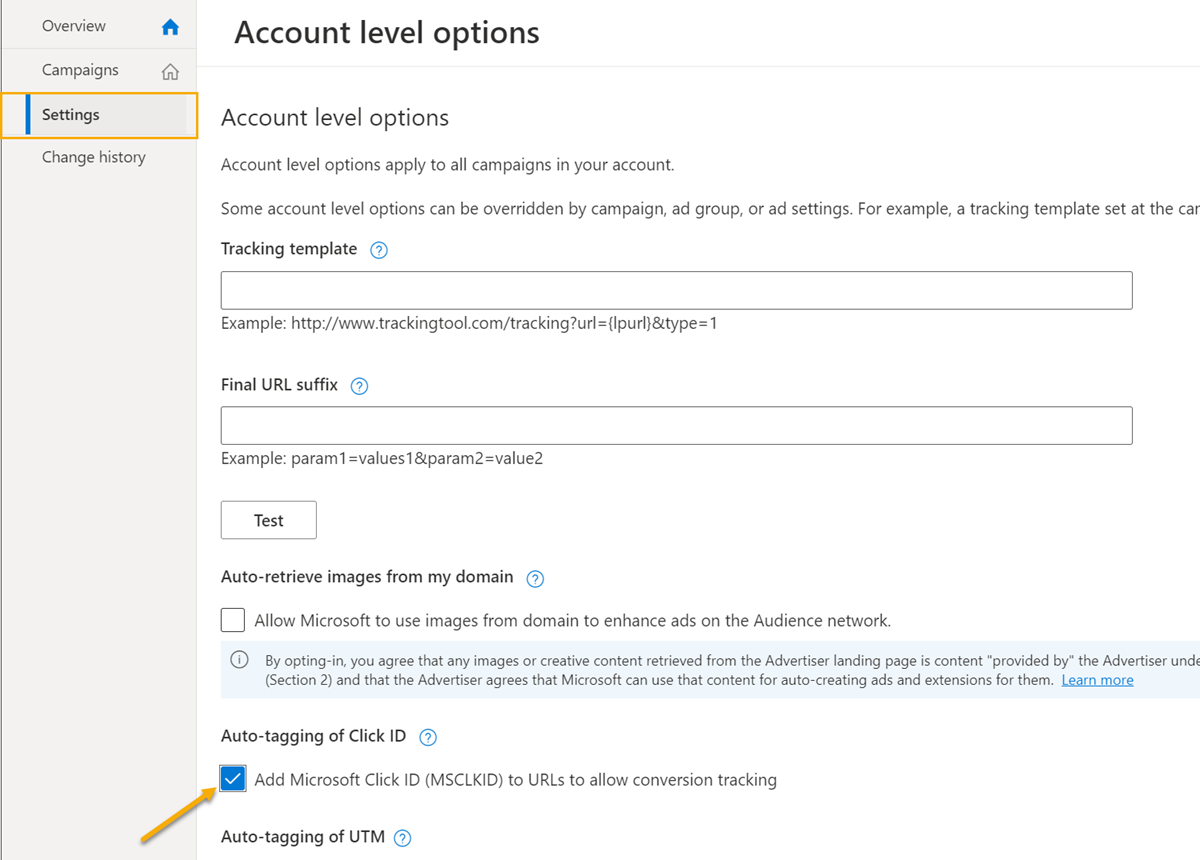
Before you get started, make sure you have auto-tagging turned on in your Microsoft Ads account by going to Campaigns > Settings and check the “Auto-tagging of Click ID” box.
.
.
Note: If you are not able to get to the Campaigns settings, you may need to switch to expert mode by going to “Tools > Switch to Expert Mode”. Then you will see the settings option on the left side for the campaigns.
Step 2 - Create a new Microsoft Ads Conversion Goal (or as many as you would like!)
While you do have the ability to use your current Conversion Goals, they are almost certainly "polluted" with bad data. We strongly recommend you create new Conversion Actions to use with ClickMagick.
Go to your Microsoft Ads dashboard and click on "Tools", and then find "Conversion Goals"
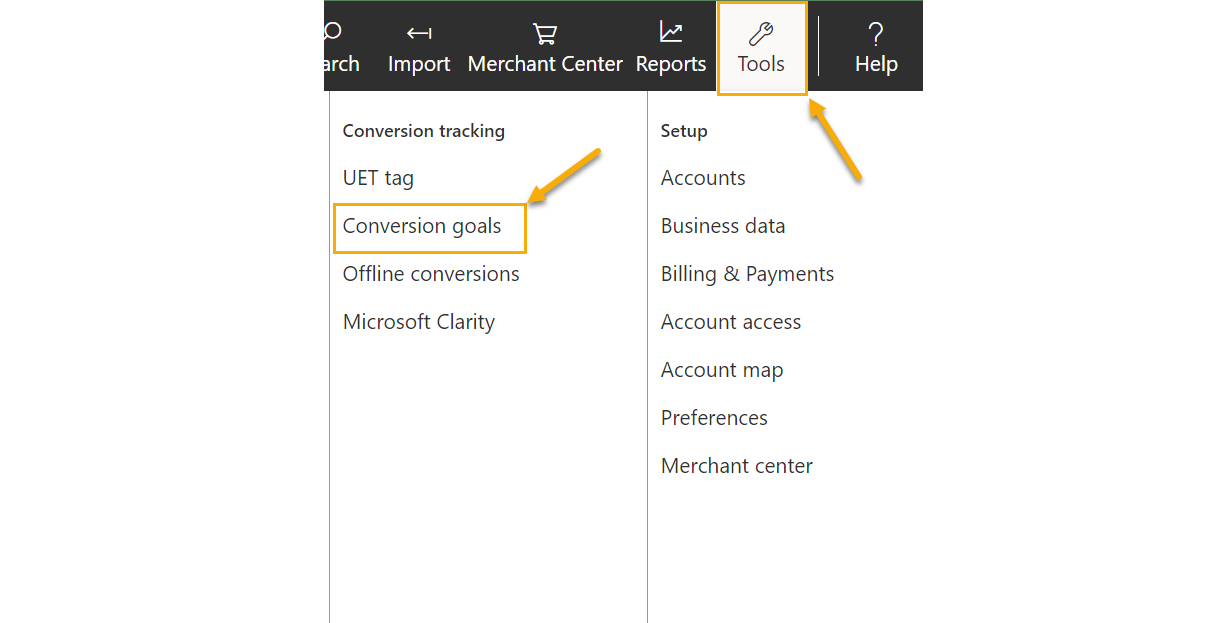
Click on the "+ Create" button to create a new conversion goal.
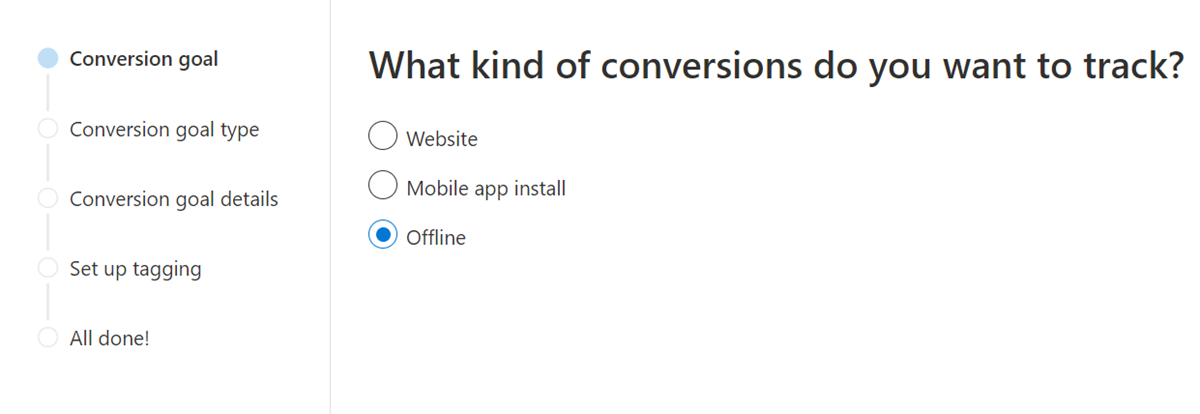
For the Type, in order for ClickMagick to be able to automatically upload the conversions, you will need to select “Offline” as the option here.
Fill out the rest of the information and make note of the name of the new Conversion Goal you created.
Note: In most cases, this conversion goal should be available to use within a couple of hours. However, Microsoft states it can take up to 24 hours for new conversion goals to be active within their system, which means it may take that long before you can use it within Audience Optimization settings.
Caution: If you select any other option besides “Offline” for conversion type, Audience Optimization will not work within ClickMagick. You will have the ability to enable the automated option for Microsoft Ads, but it will not allow you to click any of the buttons for defaults or advanced rules. If this happens to you, you will need to go back and check your Conversion Goals within your Microsoft ad account and make sure you have a conversion goal with type “Offline”.
Step 3 - Integrate your Microsoft account with ClickMagick
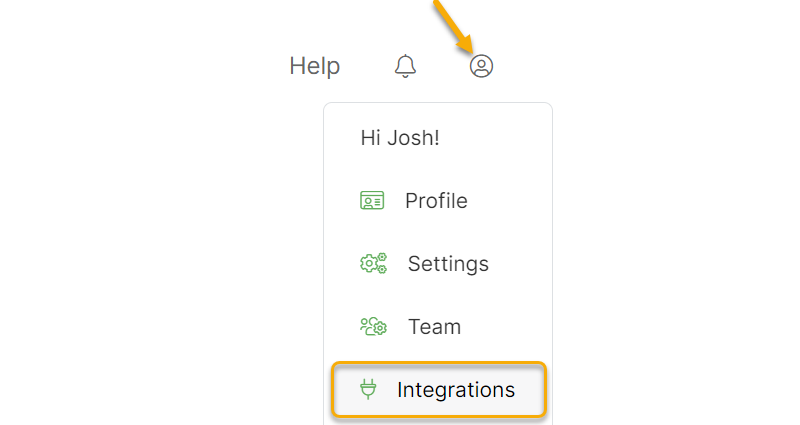
Integrate your Microsoft Ads account with ClickMagick by going to Integrations in your user account menu:
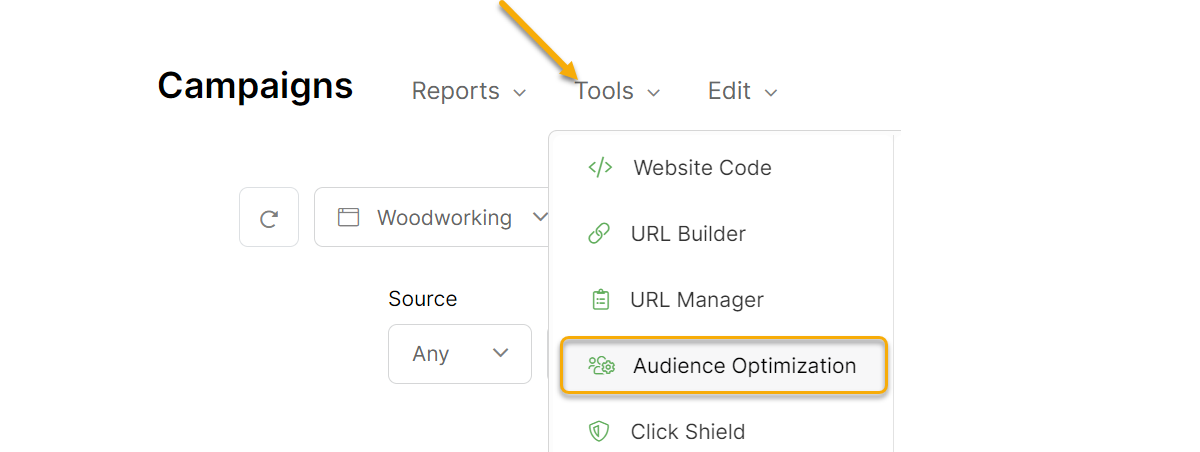
Once you’ve integrated your Microsoft Ads account into ClickMagick, you’ll then want go to Audience Optimization from the Tools menu on the Campaigns page:
You'll be presented with two options - you'll want to select Automatic, which should be selected by default.
Toggle the Enabled switch to “Yes,” and the Default Conversion Action window will pop up automatically (if this is the first time you have configured the automatic configuration)
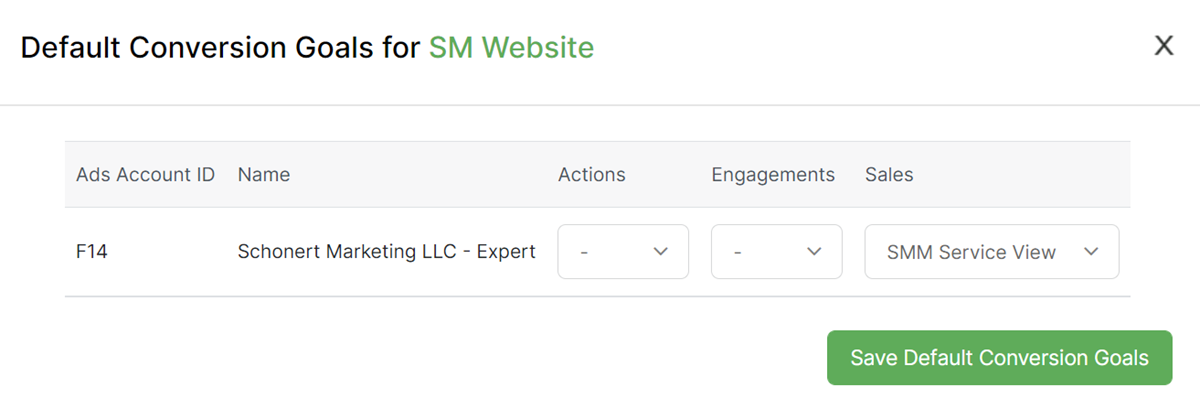
Note: You have to make a selection for Default Conversion Action in order to keep Audience Optimization active. See the ERRORS tab in this article for more information.
We find that most users generally want to optimize for sales, so if that's the case just select the Conversion Goal you want in the Sales column, hit Save, and that's all there is to it.
But know that you can also separately create and optimize for other things like Opt-Ins as well if you want. If you do, just select the appropriate Conversion Actions for ClickMagick Actions and/or Engagements as well.
The Default Conversion Goals allow you to specify a single Conversion Goal for each of Actions, Engagements, and Sales with a single Campaigns Project.
If you need to do something more advanced, you’ll want to set up Advanced Rules which you can learn about below:
How do I set up Advanced Rules for Audience Optimization?
Once you're done setting this up, ClickMagick will automatically send your actual conversion data to your Microsoft Ads Account, in real-time as each conversion occurs.
The last thing you’ll want to do is select this new conversion action as the optimization goal for your campaign. If you’re not sure how to do that, follow the article below:
How do I optimize my ads using the new ClickMagick pixel I’ve set up?
Before you get started, you'll want to make sure you've completed your Campaigns tracking setup.
There’s just a few steps to set up Audience Optimization for TikTok, and if you’re familiar with the TikTok Ads interface it shouldn’t take long at all ...
Step 1 – Create a new TikTok Pixel
In your TikTok Ads account head to Tools, then Events and then click on "Manage” under Web Events.
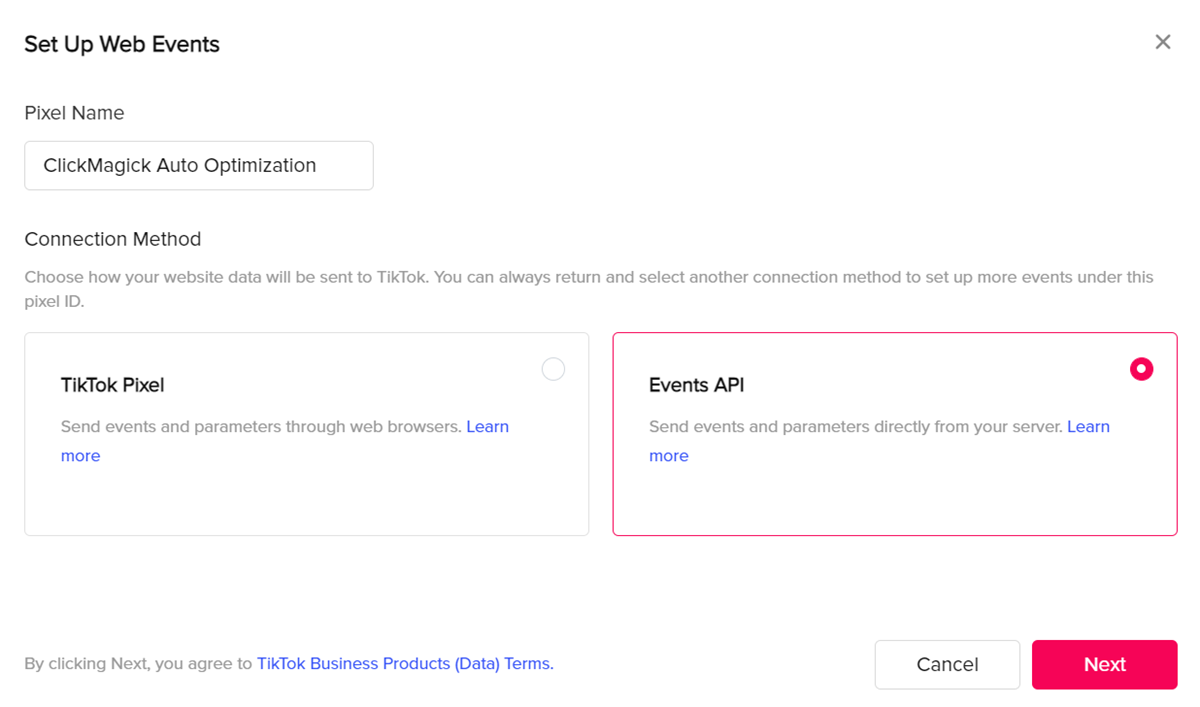
Create a new pixel, give your pixel a name and select Events API, then click Next:
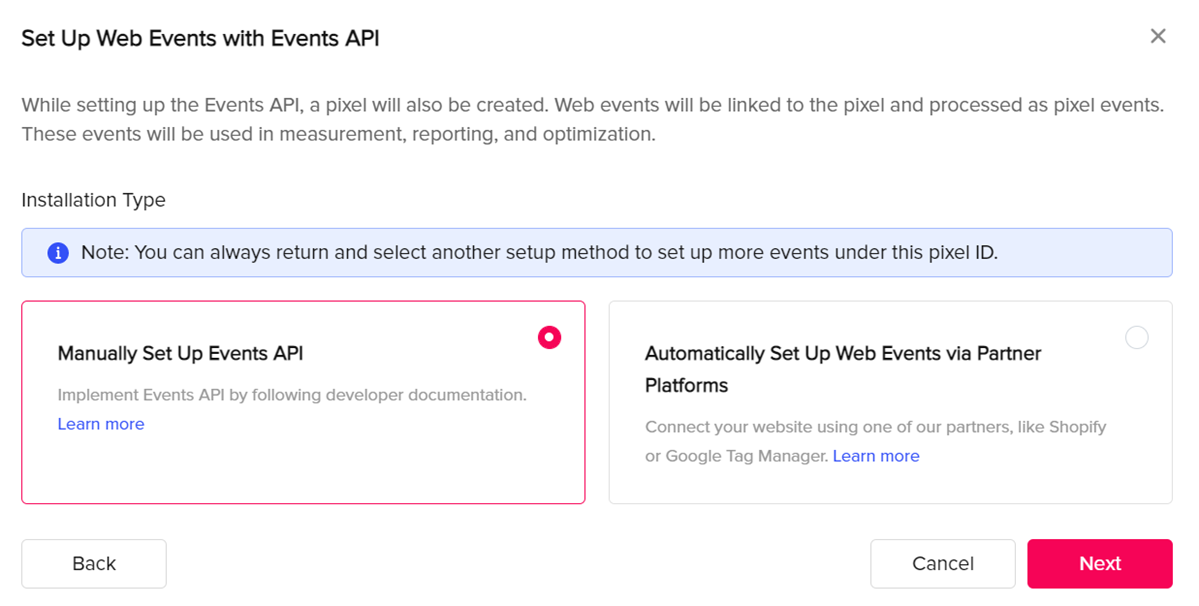
Under Installation Type, select “Manually Set Up Events API”
Caution: Do not, under any circumstances, add this new pixel to your website. If you do, it will become corrupted with bad data, and you’ll have to start over from scratch.
Step 2 – Integrate your TikTok Ads account with ClickMagick
Head to the Integrations page, and you'll see the option to log in with TikTok.
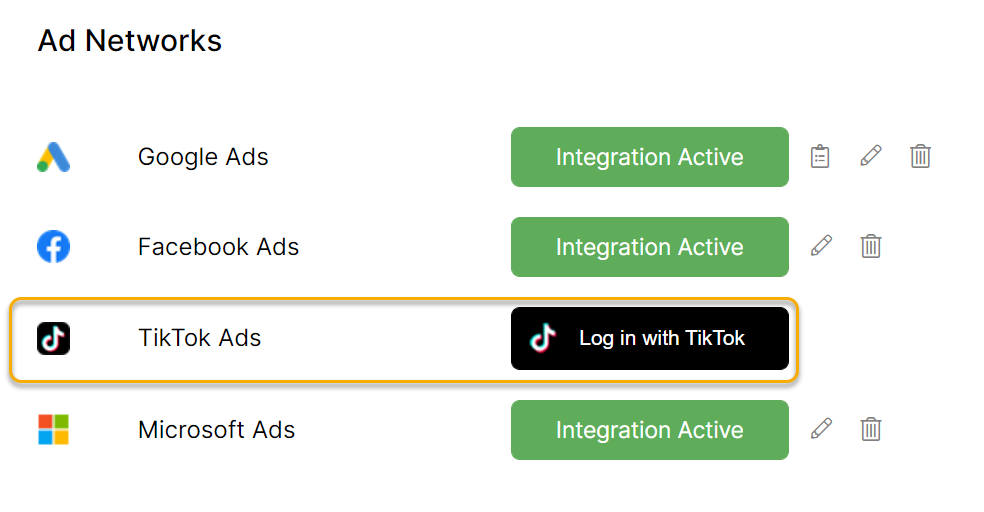
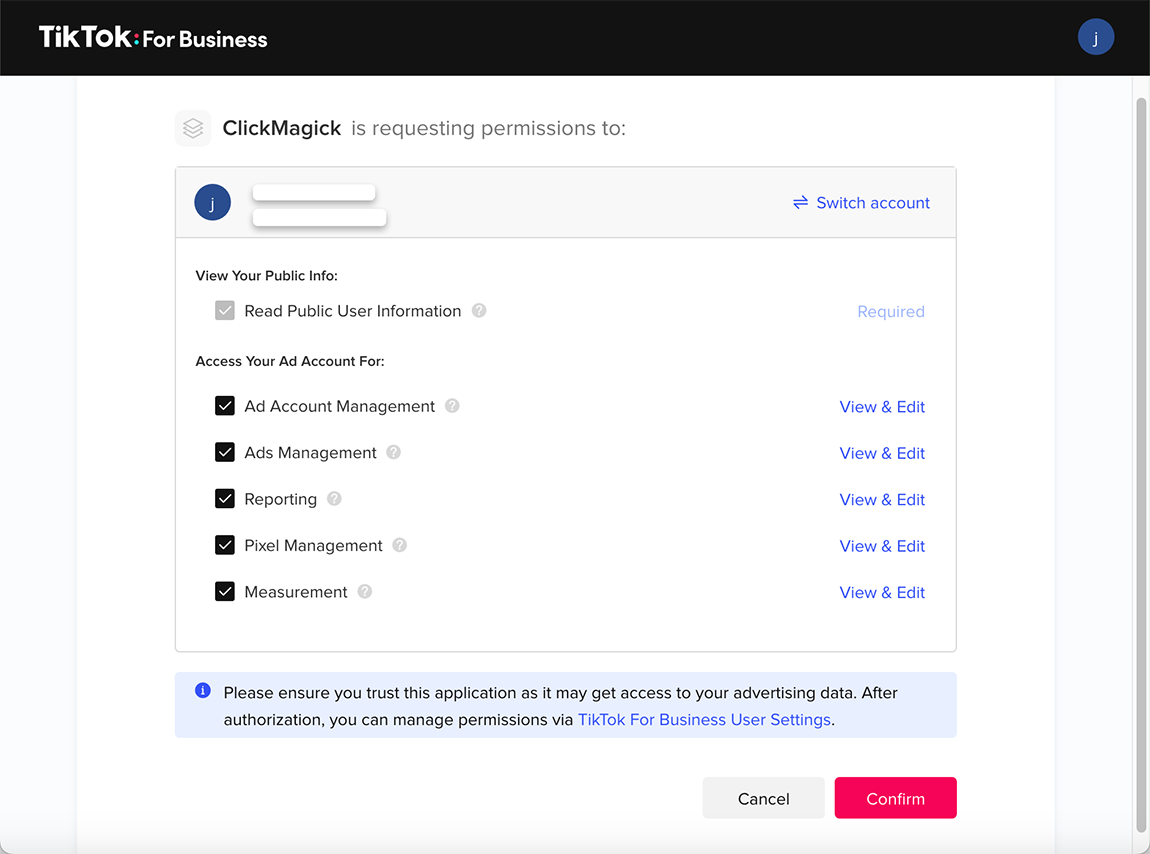
Follow the prompt and click “Confirm” to continue and select the ad account you want to integrate. Make sure to select all check boxes as shown in the image below.
Step 3 – Add your pixel details to ClickMagick
Head on over to the Audience Optimization Page and select TikTok Ads
Toggle the enable option and select the Advertiser Account, the new pixel you created and the Event name most appropriate for the conversions you'll be sending to TikTok.
Enter the URL of your homepage and submit the form, and you're done with the integration.

Note: We’ll always pass the URL where a conversion occurred to TikTok’s API when one is available. When no URL is available — for example if you’re tracking affiliate sales via Postbacks — we’ll simply pass the Website URL you entered when you saved your pixel settings. If you want ClickMagick to always send the Website URL you entered, simply enable that option.
Tip: While you can technically send Action, Engagement and Sales conversions to your pixel, TikTok only allows you to select a single event to optimize for.
So for example if you know you’re only ever going to optimize for Sales, there’s really no benefit in sending Action or Engagement conversions to your pixel.
You can however add as many TikTok Pixels as you want to ClickMagick, and use Advanced rules to determine which conversions to send to which pixels.
Step 4 – Add the TikTok Click ID to the end of your UTM Powered Link (Optional)
Starting in November 2022, TikTok has been rolling out an automated process to add the ttclid to the end of any URLs that are added when creating or editing ads in TikTok Ads Manager.
That means that you do not need to manually add the ttclid to the end of your link if you don’t want to.
Read more about this new change and how the TikTok Click ID works in the following article:
TikTok Click ID
If you still want to add the TikTok Click ID to the end of your UTM Powered Link, you can do so by following the instructions below:
Manually add the TikTok Click ID
Step 5 – “Season” Your New TikTok Pixel
Switching to a new pixel with only accurate data is a very smart move, but it does require “starting over” for optimization purposes. So for the best performance, you’ll want to “season” this new pixel a bit before using it.
To be clear – we recommend that you do NOT start using this new pixel for optimization immediately. If you do, you’ll almost certainly see a temporary drop in ad performance.
Instead, set everything up, start sending some traffic, let ClickMagick track your clicks and conversions, and send your conversion data to your new TikTok pixel.
This will “season” your pixel and allow TikTok's AI to learn what your ideal customer looks like.
We can’t tell you exactly how long to season your new pixel as it depends on the number of conversions you get daily, your audience and many other factors …
The short answer is “the longer, the better,” but we suggest waiting at least a week or two, and then you can go ahead and test your new pixel’s performance by using it to optimize a single campaign or a single ad set.
If things don’t go great, you need to send TikTok more data to work with, so stop using the pixel for a while, let us send more data, and then try it again in a week or so.
Once you’re happy with the performance of your new pixel, you can go ahead and apply it to your other campaigns.
Step 6 – Use Your New Pixel for TikTok Ad Optimization
When ready, you’ll use your new Pixel to optimize your TikTok ads.
If you want to optimize for an Action like an opt-in, you will want them to appear in your pixel as the “Submit Form” event. So when optimizing your ads, you would select your new pixel and then select the “Submit Form” event.
For Engagements, such as visiting a checkout page, you’d choose the “Initiate Checkout” event, and for Sales, it’s the “Complete Payment” event.
And that's it. Once you’re done setting things up, ClickMagick will automatically send your actual conversion data to your TikTok Ads Account, allowing the performance of your ads to increase.
If you're not sure how to start using the new pixel to optimize your ads, follow the article below:
How do I optimize my ads using the new ClickMagick pixel I’ve set up?
Step 7 – Capture and Send Visitor Info with your TikTok Conversions
iOS users who opt out of tracking can no longer be individually tracked by TikTok Ads – and this means their ad optimization algorithms don’t work as well as they used to.
To solve this problem, ClickMagick can capture first-party data collected on your site and pass it to TikTok Ads with your conversions to generate the absolute highest event match scores possible.
If you haven’t already, follow the steps in this article to allow ClickMagick to capture your visitors’ info:
How do I capture visitor info from forms on my site in ClickMagick?
TikTok only requires the addition of a visitor’s email address or phone number to achieve the best event matching they are capable of, and ClickMagick will automatically send this info with each conversion if it’s available.
In addition to the configuration within Audience Optimization itself, there are a few additional settings you should be aware of which can be found on the Audience Optimization tab of your User Settings …
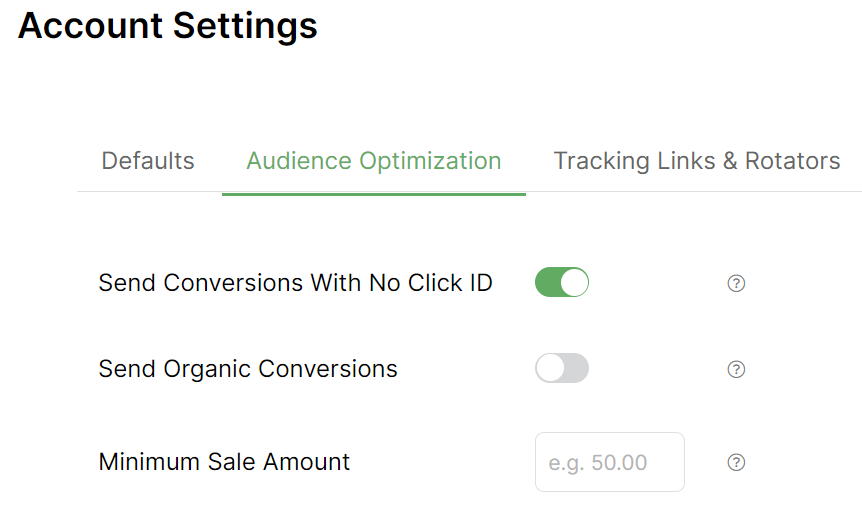
Send Conversions With No Click ID
ClickMagick automatically sends your conversions back to your ad networks based on the ad network Click ID associated with the initial click that led to a particular sale.
If you enable this setting, ClickMagick will instead attempt to send all of your non-organic conversions back to all of the ad networks you’ve integrated with.
*** See below for requirements to trigger sending a conversion to each ad networkSend Organic Sales
You can turn this on if you want ClickMagick to also send “organic” sales to your ad networks.
While these sales generally aren’t associated with a specific ad, some marketers believe that the more sales you send back to your ad network, the better the ad network can find you more new customers like them.
*** See below for requirements to trigger sending a conversion to each ad networkMinimum Sale Amount
If you specify an optional Minimum Sale Amount, sales below this amount won’t be sent to your ad networks.
Note that this will apply to all of your Campaigns Projects, and all of your ad networks, and the amount will be treated as being in the currency of the Project where the sale occurred.
If you need more control e.g. you want to set different Minimum Sale Amounts for different Projects, you should not use this feature. Instead you should set up Audience Optimization Advanced Rules on a per-project basis to send sales below any particular amount to a “dead” pixel you don’t use.
Requirements to Trigger Sending Conversions
Facebook – For a conversion to be sent to Facebook, one of these values must be present for the visitor in ClickMagick:
fbclid, email, first name, last name, phone, mobile, date of birth, gender, city, state/province, postal code, countryGoogle – By default, for a conversion to be sent to Google the originating click must have a
gclid or wbraid. If Enhanced Conversions are turned on in Google, email, phone or mobile can be used in place of a Google Click ID.Microsoft – For a conversion to be sent to Microsoft Ads, the originating click must have a
mscklid. Enhanced Conversions are not yet available to most users in Microsoft Ads.TikTok – For a conversion to be sent to TikTok, at least one of the following values must be present for the visitor in ClickMagick:
ttclid, email, phoneClickMagick sends your conversions to your ad networks in real-time, but it can take them many hours – and sometimes even days – to process the data and display it in your ads account.
Please see the article below to learn more …
Why don’t I see an uploaded conversion in my ad account?
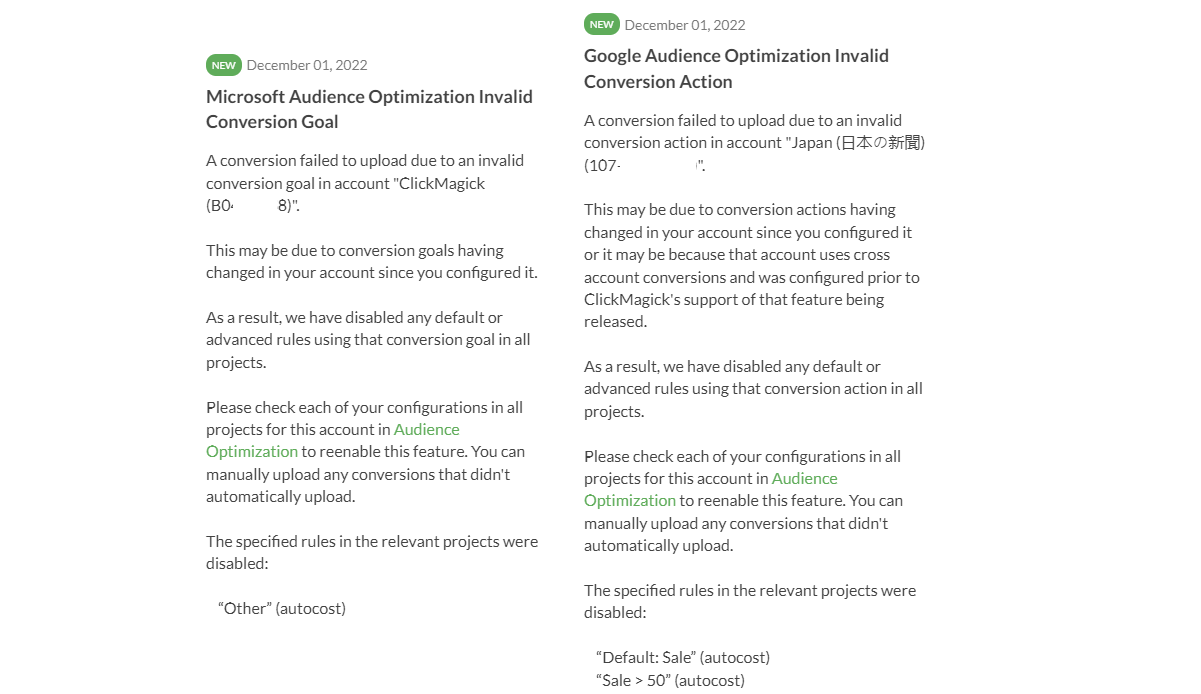
Audience Optimization provides a log for each ad network you’ve integrated with ClickMagick, showing all of the conversions we’ve uploaded on your behalf and the status of each.
If you see any errors, remember that this has nothing to do with ClickMagick – an error indicates that the ad network rejected our attempt to upload the conversion.
When viewing the Audience Optimization log, you can see why your ad network rejected it, and most are pretty self-explanatory.
Below we’ll cover a few examples of errors you may see, what they mean, and what you can do about them.
Google Ads - Action Not Permitted With Braid
Google Ads / Microsoft Ads – Invalid Conversion Action or Invalid Offline Conversion Name
Google Ads / Microsoft Ads – Nothing Selected For Default Action / Default Goal

Article 686 Last updated: 03/30/2024 12:57:34 PM
https://www.clickmagick.com/kb/?article=686